Table of Contents
How to install Plex Media Server in a Proxmox Linux Container (LXC)
Proxmox containers are a lightweight alternative to fully Virtualized Machines (VMs). We will in this guide show how Plex Media Server can be installed in a Linux Container (LXC).
Introducing Linux Containers (LXC)
Linux Containers (LXC) use the kernel of the host system instead of emulating a full Operating System (OS). This means that containers can access resources on the host system directly and at much lower memory cost. As an example, Plex Media Server running in a VM can easily fetch several Gigabytes of RAM, while in a container, the same installation uses only a few of hundred Megabytes.
Privileged vs Unprivileged
LXC Containers can be of two kinds; privileged and unprivileged. In a privileged container you will be able to modify resources that exist outside the container, while in an unprivileged container, it is only possible to modify external resources once the host has given its explicit permission.
We will in this tutorial cover privileged containers only due to their ease of use and by assuming that your Proxmox environment resides on a non-public facing, trusted Local Area Network (LAN). If you are concerned about security; use unprivileged containers, but be aware that you cannot delete any external files from inside the Plex Media Server container*.
Based on the information provided by this guide.
Software Versions Used
At the time of writing, the following software versions were used:
We have further assumed that Plex Media Server will be installed on a default Proxmox configuration with one node and one hard drive.
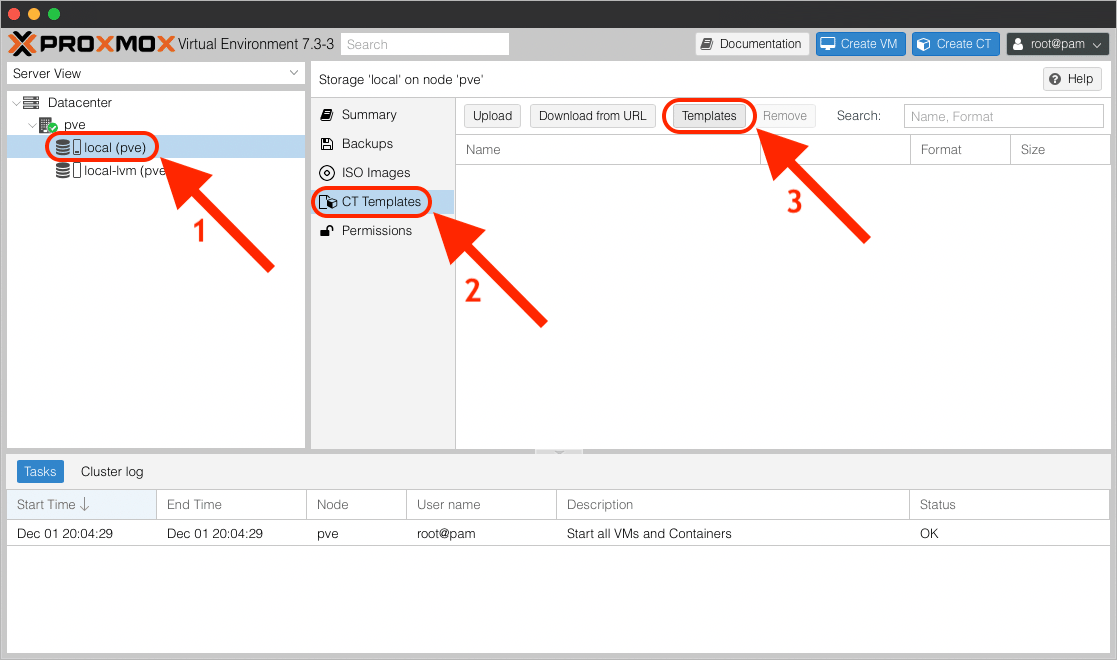
Templates
With the formalities out of the way, let’s go ahead and download our first LXC Template.
Pick a storage area for the container. We have chosen the local disk; local (pve) [1] and then selected CT Templates [2], followed by the Templates [3] button.
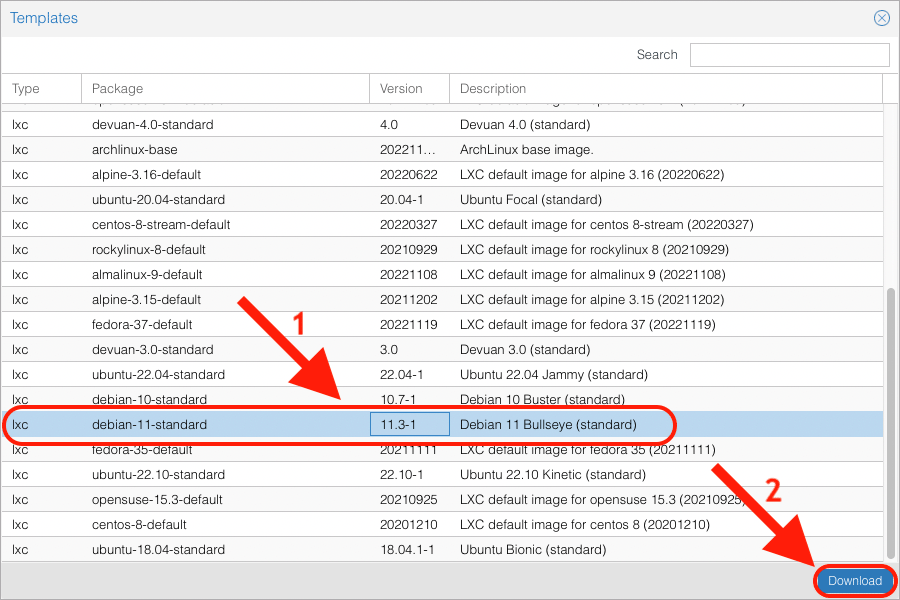
Debian
Plex Media Server can run on many platforms, but we prefer Debian, and more specifically the debian-11-standard 11.3-1 [1] template, because it is stable, secure and the base for many other Linux distributions, such as Ubuntu.
Once you have selected the template, press Download [2].
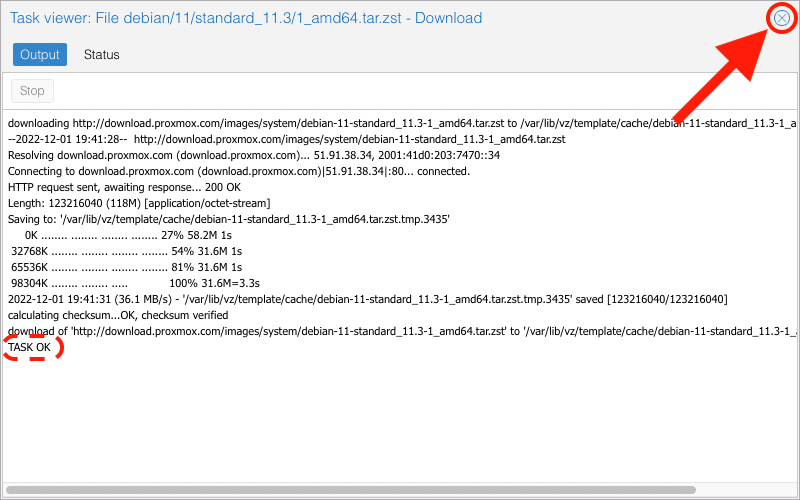
Close the Task Viewer once the download is complete.
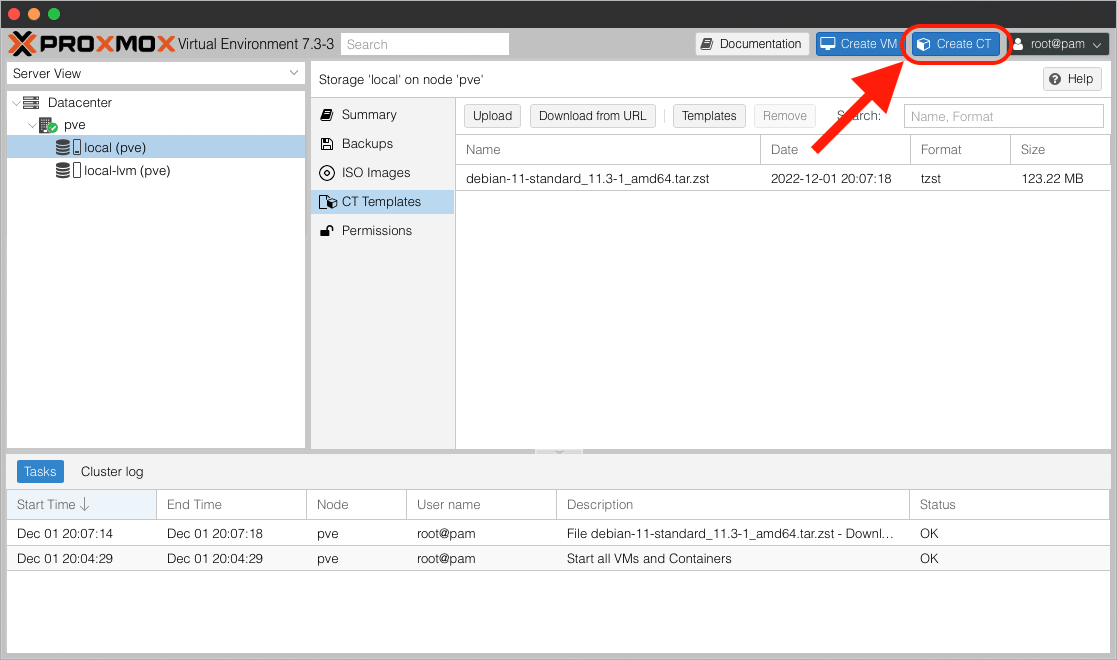
Creating the Container
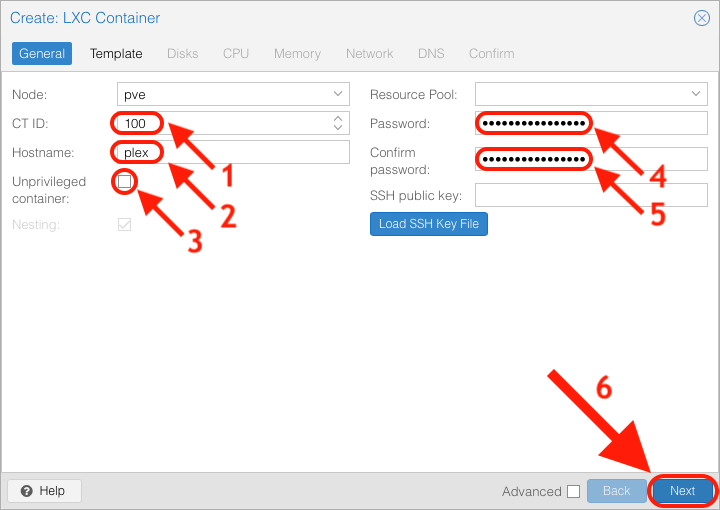
We are now ready to create the LXC Container. Press the Create CT button in the upper-right corner.
Set CT ID [1] to a number of your choice*. We have chosen 100 and given our Hostname [2] the name plex.
If you want the option to be able to delete external files from within Plex Media Server, set Unprivileged container [3]
to off, i.e. make it a Privileged container.
Finally, enter and confirm your super-secret Password [4][5].
Press Next [6].
*Container numbers start from 100 to “infinite” and cannot overlap with existing containers or VMs.
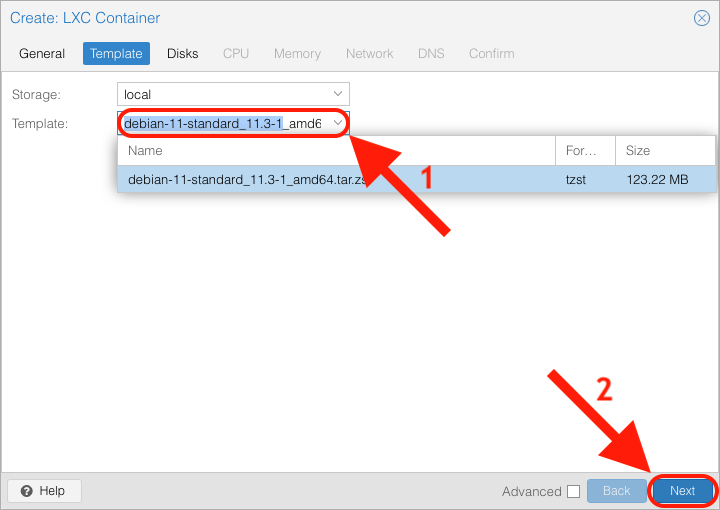
Select debian-11-standard_11.3-1_amd64.tar.zst (the file that you just downloaded), from the Template [1] list.
Press Next [2].
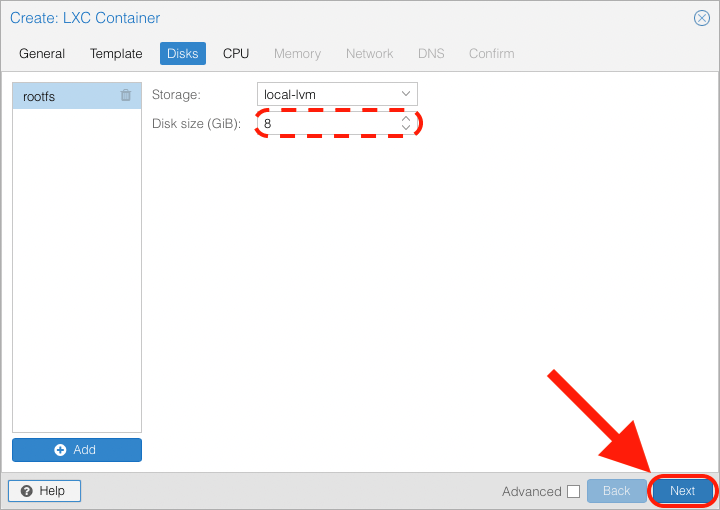
Optional: Adjust Disk size if you intend store your media inside the LXC Container (not recommended), or if you need more space for metadata and thumbnails.
Press Next.
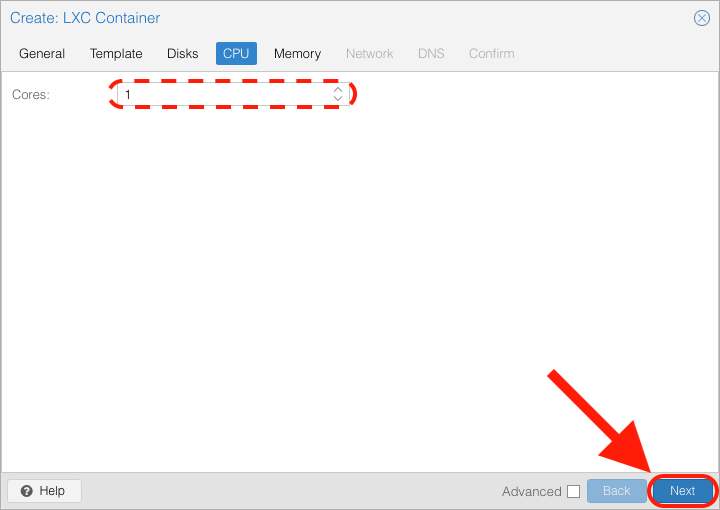
Optional: Set the number of CPU Cores. We are just using 1 core in this example, but adjust higher if you think
you will need more power.
Press Next.
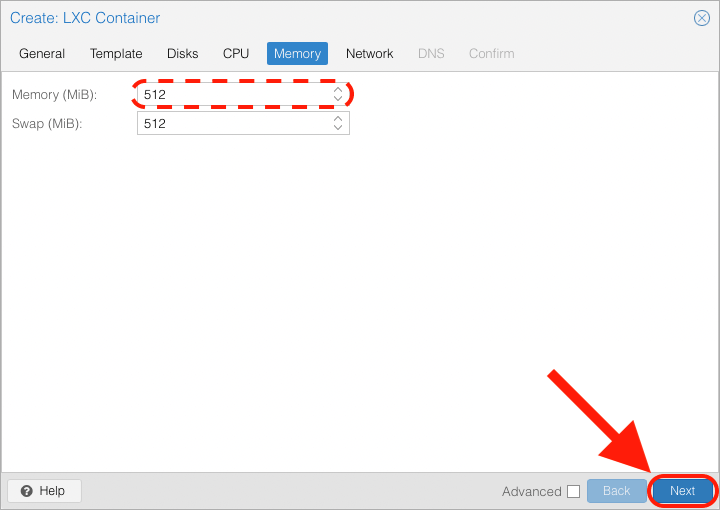
Optional: The Plex container can run with only 512 MiB RAM, but adjust here if you think more memory will be required.
Press Next.
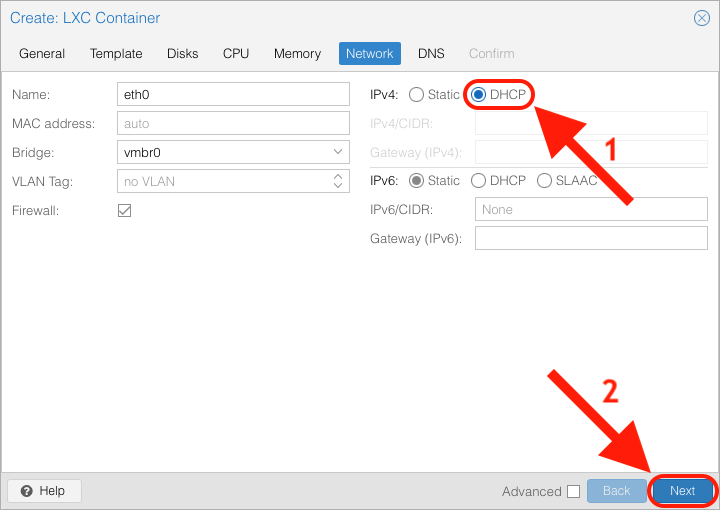
We will access the Plex Media Server interface via IPv4 DHCP [1], but you can also leave it at static if you do not have the option (or do not want) to create a Static DHCP reservation on your router.
Press Next [2].
We will let our router handle DNS queries, but adjust here if necessary.
Press Next.

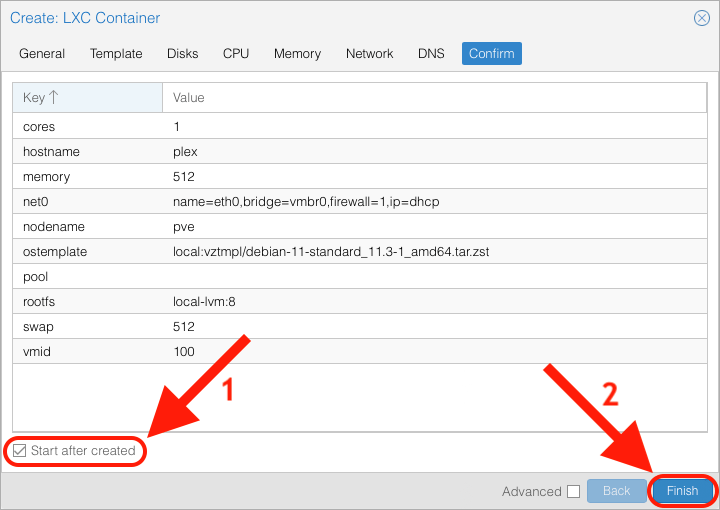
Confirm that all settings are okay and tick Start after created [1].
Press Finish [2].
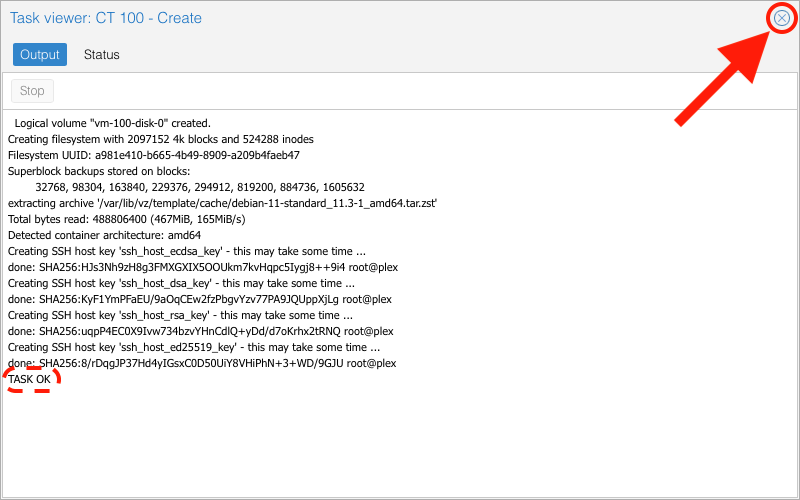
Close the Task Viewer once confirmed that the container has been created.
Your LXC Container should now be ready and up and running.
Configuration
We are now ready to log in to the container.
Navigate to 100 (plex) [1] and select Console [2].

Login as root, followed by your super-secret Password.
root
<password>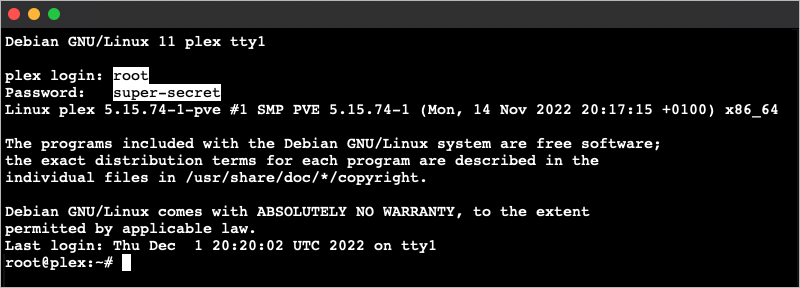
Updating the System
There is a good chance the default software packages that came with the Debian 11 template are out-of-date. We will therefore update the APT repository to ensure we have the latest list of packages.
In the terminal window, type:
apt update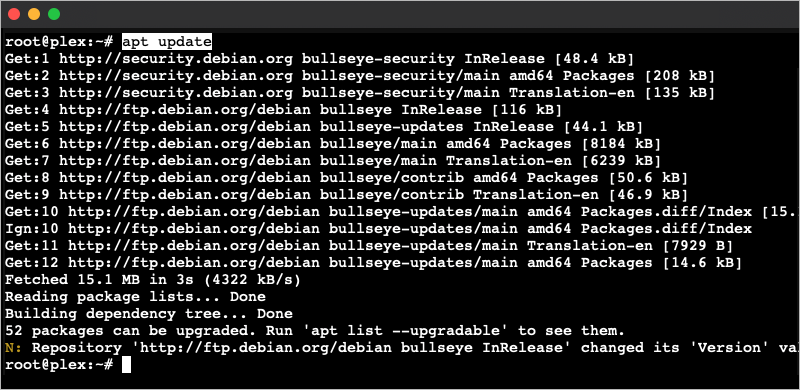
Followed by the upgrade command:
apt upgrade -y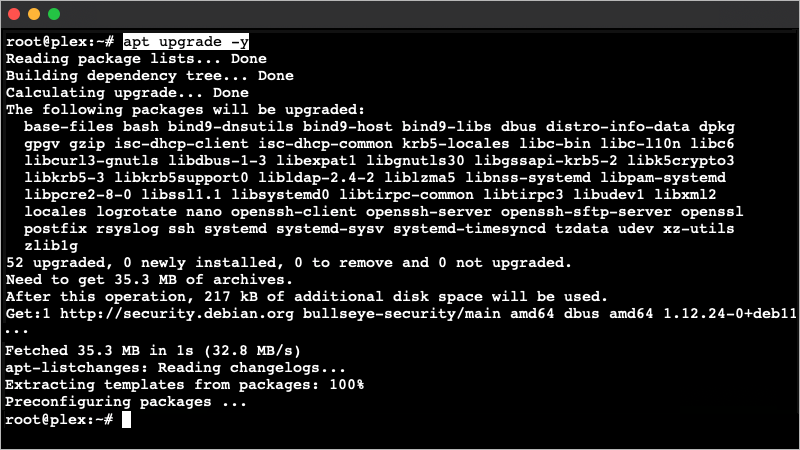
Installing Plex
Plex Media Server is not included, by default, in Debian’s APT repositories, which means that it will have to be downloaded separately from Plex.tv’s servers.
We will first, however, need to install curl to enable fetching of URLs and gnupg for secure authentication:
apt install curl gnupg -y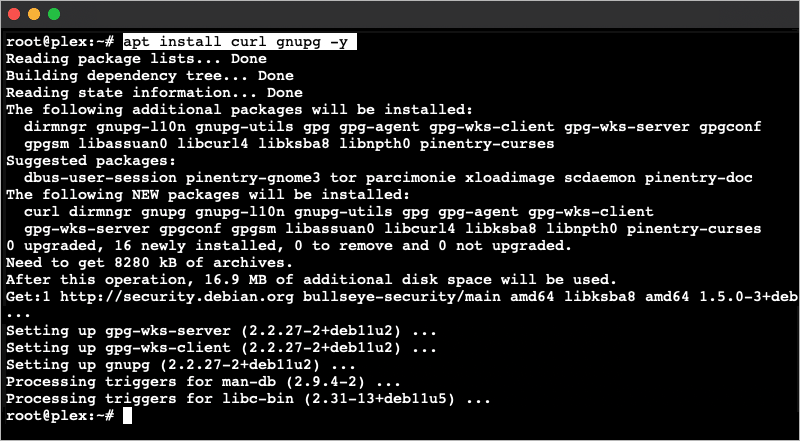
To install Plex, a repository file must be created that pulls directly from the Plex repository.
But first, a GPG key must be imported with the curl command and saved under /usr/share/keyrings/plex.gpg.
curl -sS https://downloads.plex.tv/plex-keys/PlexSign.key | gpg --dearmor | tee /usr/share/keyrings/plex.gpg > /dev/null 
Next, add the Plex repository to the standard APT sources directory.
echo "deb [signed-by=/usr/share/keyrings/plex.gpg] https://downloads.plex.tv/repo/deb public main" > /etc/apt/sources.list.d/plexmediaserver.list
Plex Media Server is now first class citizen in our APT repository, which means that we can go ahead and install the package as normal with the following command:
apt update && apt install plexmediaserver -y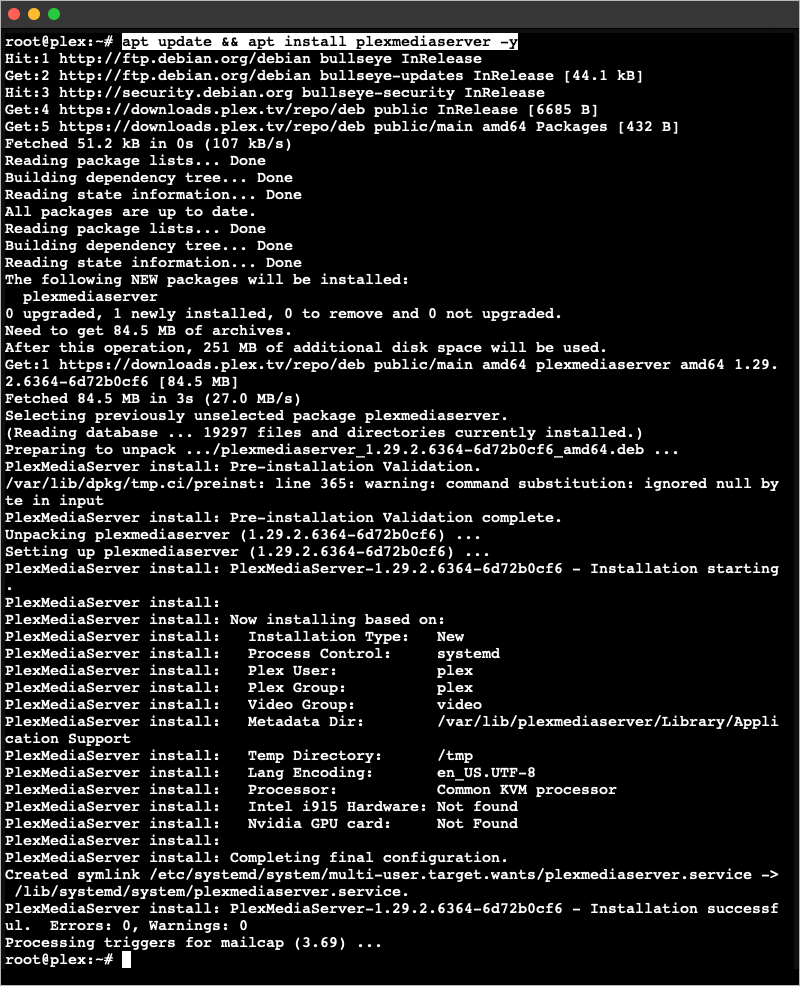
Optional: Reboot the container to ensure that any currently locked process are re-initialised after the package update.
reboot
Log back in with your credentials.
root
<password>
Verify that Plex is active (running) with the systemctl command:
systemctl status plexmediaserver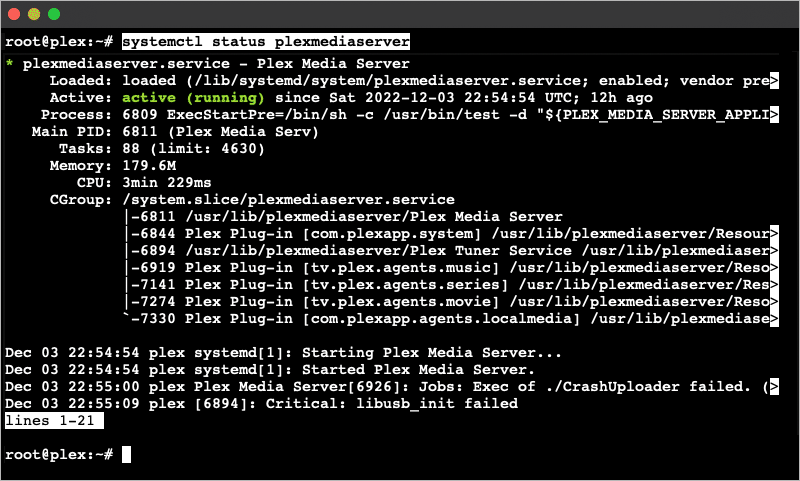
The eagle-eyed user might see the following, rather worrisome, error message:
Critical: libusb_init failed
After some Google-Fu:ing we ended up on the following Reddit page which provided an explanation as to why the error is shown, but the suggested solution did not work in our case. libusb is, however, only used for Plex’s DVR functionality, and should not affect standard movie watching. If you do have a work-around, please post it in the comments below, and we will update this article.
(Press q on the keyboard to exit this screen.)
Logging into Plex
The Plex Media Server service is now up and running and we should be able to launch a web browser to access its web interface.
First we need to find out the IP address for our server:
ip a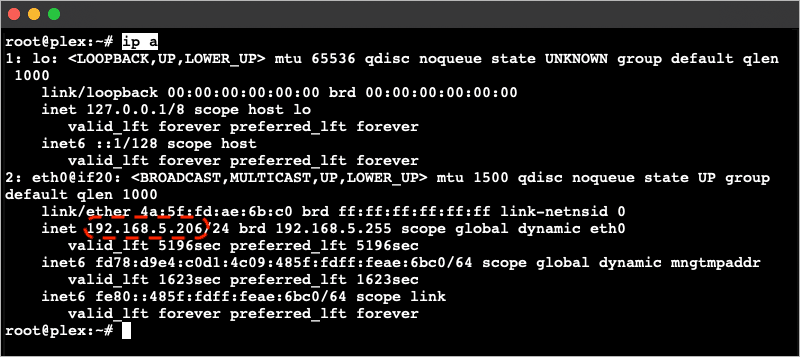
Our container’s IP address resolves to 192.168.5.206, so we will use that, followed by Plex’s standard port number,
32400, and /web directory when typing the URL in our browser:
https://<your_plex_server_url>:32400/web
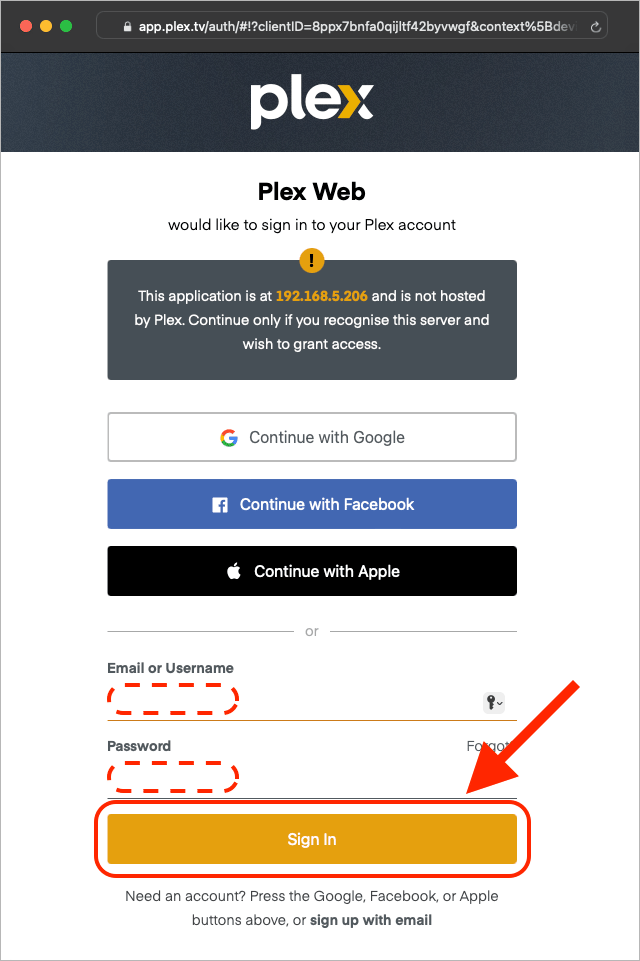
If you typed in the correct address, you will be automatically redirected to https://app.plex.tv for login authentication.
Go ahead and sign in with your Username and Password and then press the Sign In button.
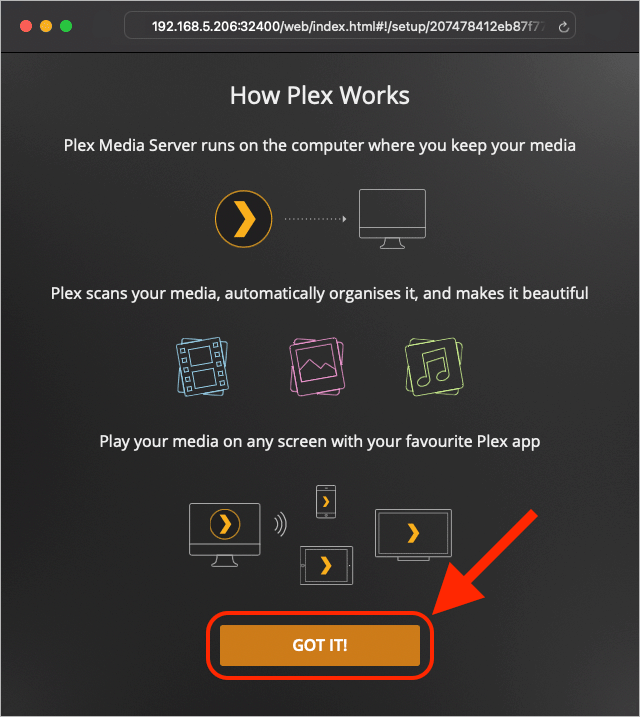
Yep, we Got It!
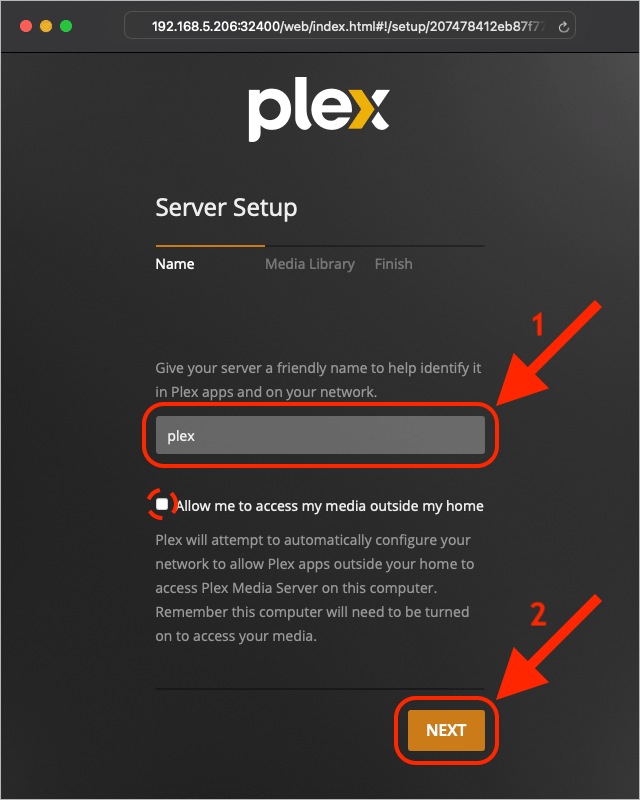
Give your server a friendly Name [1], such as plex.
Optional: We will not allow Plex to automatically configure our network for outside access as there are much better (and safer) ways to access your home network, such as through a VPN.
Press Next [2].
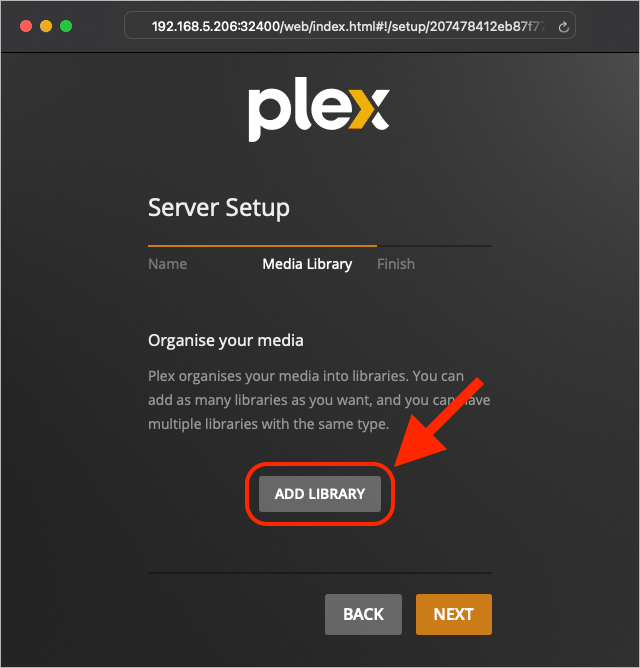
Adding Media to Plex
We are now ready to add our legally downloaded media files to Plex.
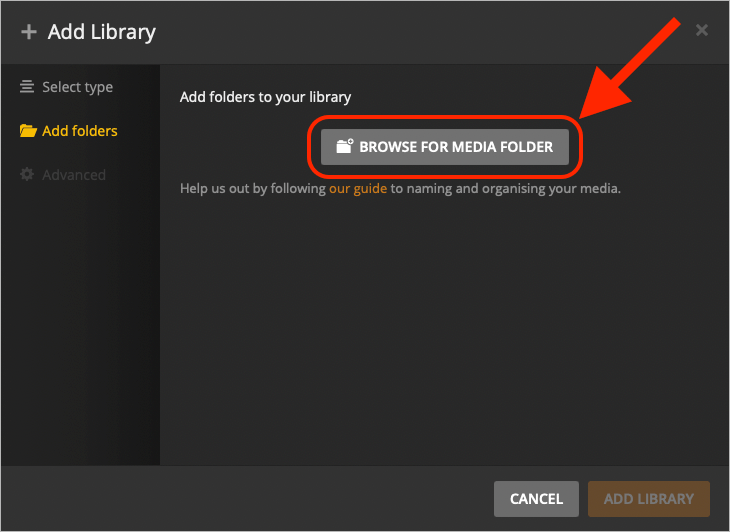
Press Add Library.
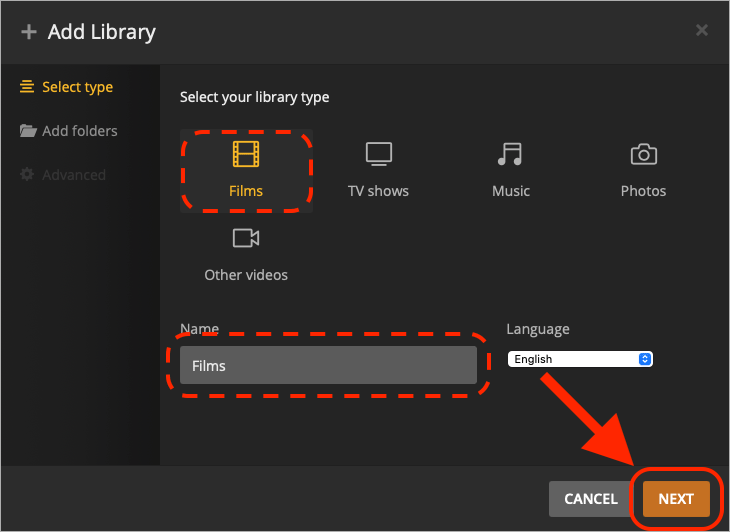
Let’s start with some Films.
Press Next.
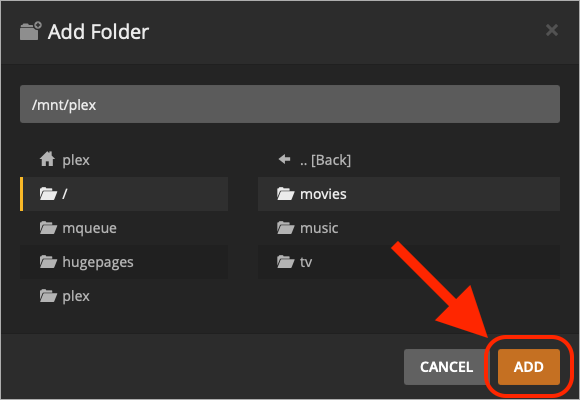
To add your movies, Press the Browse for Media Folder button.
Wait a minute! Where are my movie files?!
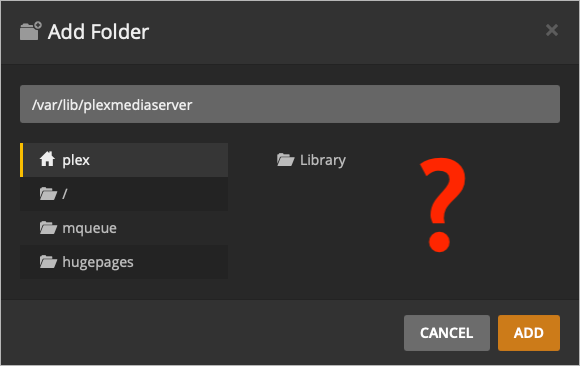
Unless you are storing your entire movie library inside the LXC Container (not recommended), you will need to find a way to access your files from outside the container. There are several ways that this can be done.
If your files reside on a Network Attached Storage (NAS), it is common to access them via the SMB/CIFS or NFS protocols.
If the files are in a directory on the Proxmox host, they can be directly mounted in the host onto the container.
We will in the next three sections explain the most common methods for how files can be accessed from inside the LXC Container. Please follow along with the option that applies to your specific network setup.
- Option 1: Mounting an SMB/CIFS share
- Option 2: Mounting an NFS Share
- Option 3: Mounting a directory on the Proxmox host
Option 1: Mounting an SMB/CIFS share
The SMB/CIFS protocol provides support for cross-platform file sharing with Microsoft Windows, OS X, and other Unix systems.
Installing cifs-utils
Let’s return to the container’s console and install the cifs-utils package.
apt install cifs-utils -y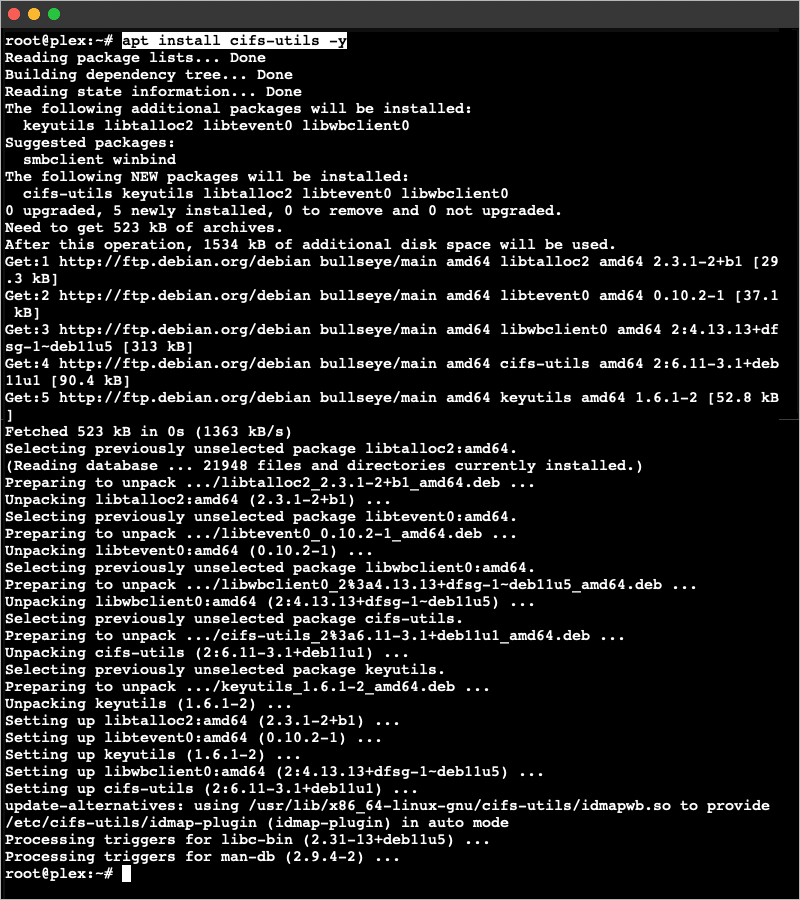
Creating CIFS Credentials
Once cifs-utils have been downloaded, create an empty text file and place it under /root/.cifs_credentials. We prefer
nano, but use whichever text editor you are comfortable with.
nano /root/.cifs_credentials
Inside the file, add your SMB/CIFS username=<username> on the first line and password=<password> on the
second line.
Tip: (Ctrl+o saves the file and Ctrl+x exits the editor.)
username=<username>
password=<password>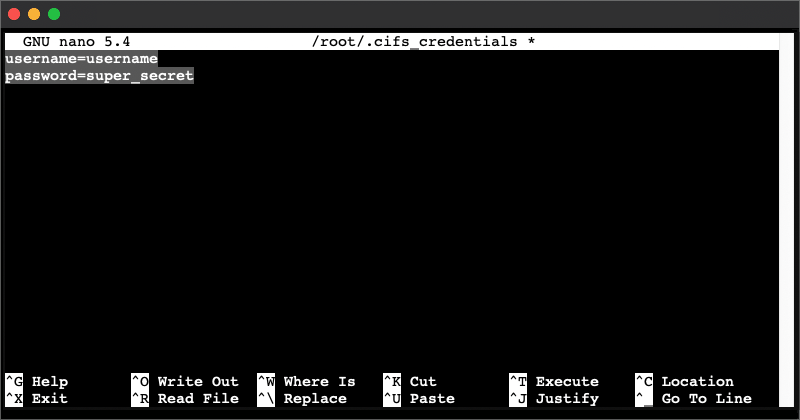
Optional: Increase security by adjusting the read/write permissions on the file to the current owner only.
chmod 600 /root/.cifs_credentials 
Creating the Mount Directory
Create a directory in which we will mount our SMB/CIFS share. As we are using Plex, let’s give the directory the appropriate
name;/mnt/plex.
mkdir <directory>
Retrieving Plex uid and gid
This step is necessary if you want to allow deletion of media files from within Plex Media Server.
When a directory is mounted it will belong to the user who first mounted it. In our example, the owner is root, while
Plex Media Server runs as user plex. It will therefore not be able to modify any files belonging to root unless
ownership is changed during the mount process.
In order to do so we need to first retrieve the User ID (uid) and Group ID (gid) of user plex.
Execute the following command and write these numbers down because they will be used in the next section:
id -u plex && id -g plex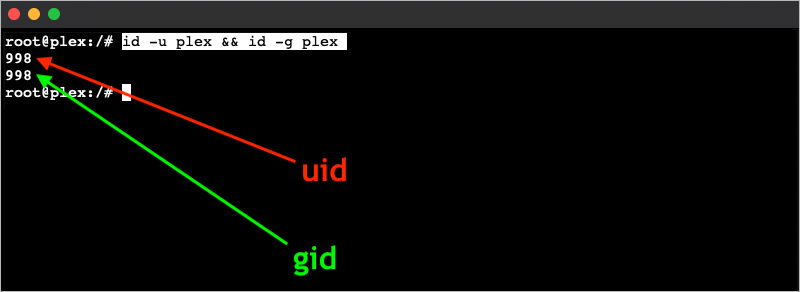
Systemd
We will mount our network share with systemd, rather than fstab, because the latter does not seem to remount on reboot as discussed in this Reddit post.
Under /etc/systemd/system/, create a new unit configuration file (.mount)
that inherits its name from the full path to your mounted directory, with the quirk that all forward slashes / are
replaced with a hyphen -.
Example 1:
Your plex directory resides under /mnt/plex. Your unit configuration file should therefore be called
/etc/systemd/system/mnt-plex.mount.
Example 2:
A randomly shared folder under /home/geek/Public/important_files must be called
/etc/systemd/system/home-geek-Public-important_files.mount and nothing else!
Armed with this information, let’s go ahead and create the file:
nano /etc/systemd/system/<directory-with-hyphen>.mount
Add the following information and replace <server_path>, <share>, <mount_point>, <uid> and <gid> as necessary.
Save and close the file.
[Unit]
  Description=Plex Media Server files
  Requires=network-online.target
  After=network-online.service

[Mount]
  What=//<server_path>/<share>
  Where=/<mount_point>
  Options=credentials=/root/.cifs_credentials,uid=<uid>,gid=<gid>
  Type=cifs

[Install]
  WantedBy=multi-user.target
Enable the unit configuration file:
systemctl enable <directory-with-hyphen>.mount
Start the directory service to automatically mount the folder:
systemctl start <directory-with-hyphen>.mount
Verify that the files are now seen in the mounted directory.
ls -l <mount-path>
Great, the files are there, and we can now go ahead and add this folder to Plex Media Server in Completing the Setup.
If you are using NFS shares instead, read on for Option 2: Mounting an NFS Share.
Caution: If you are continuing from Option 1: Mounting an SMB/CIFS share, please reset the container first and restart the tutorial from the Configuration section. Your mounted directory will otherwise be mapped twice with different protocols!
Option 2: Mounting an NFS Share
Network File System (NFS) is a distributed file system, which in comparison to SMB/CIFS, has better performance when medium-sized or small files are accessed.
If your LXC Container is still running, please turn it off with the Shutdown button.

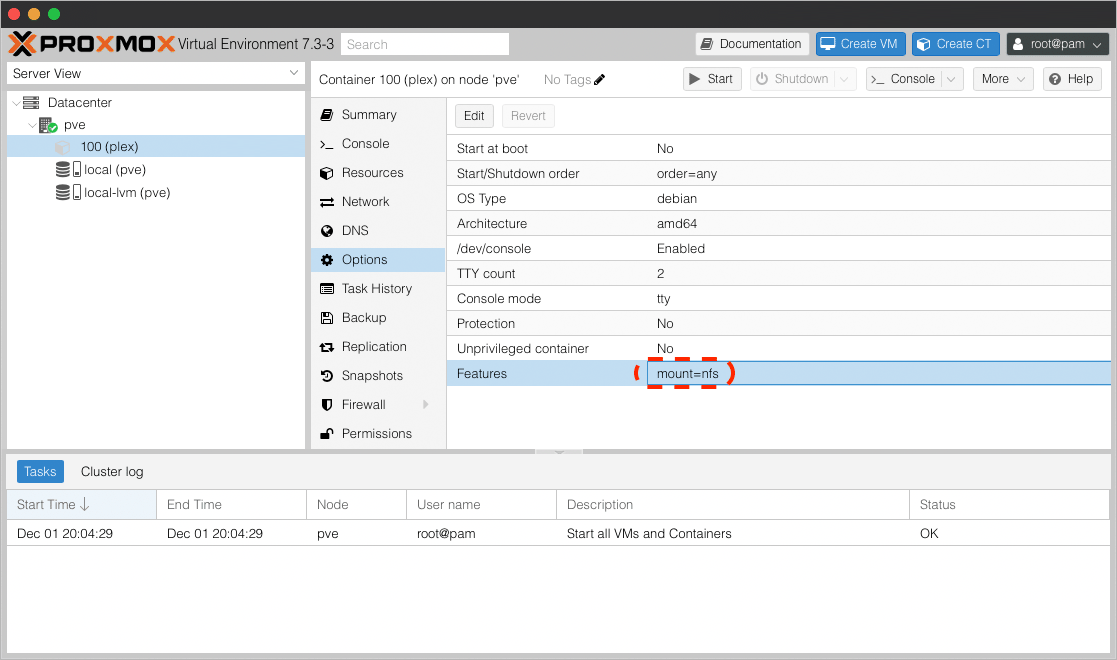
Enabling NFS Container Support
Assuming that you are using a Privileged container, click on 100 (plex) [1], then Options [2] and double-click on Features [3].
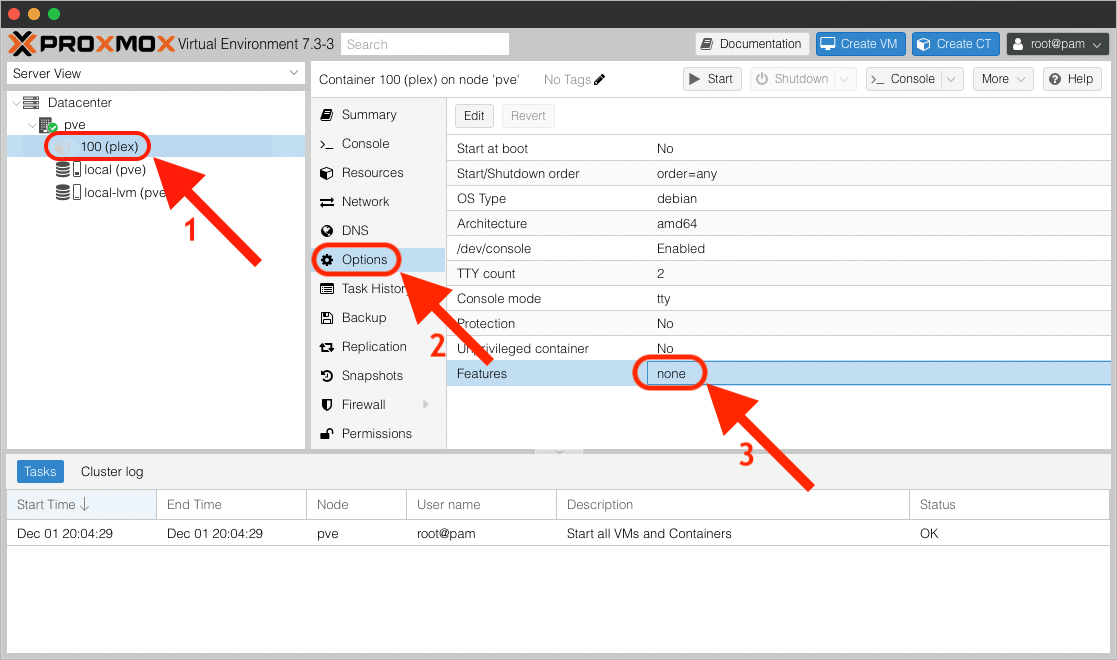
Enable NFS [1] and press OK [2].
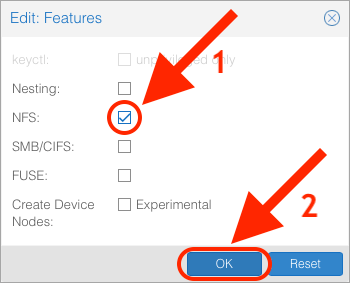
Features should now display mount=nfs.
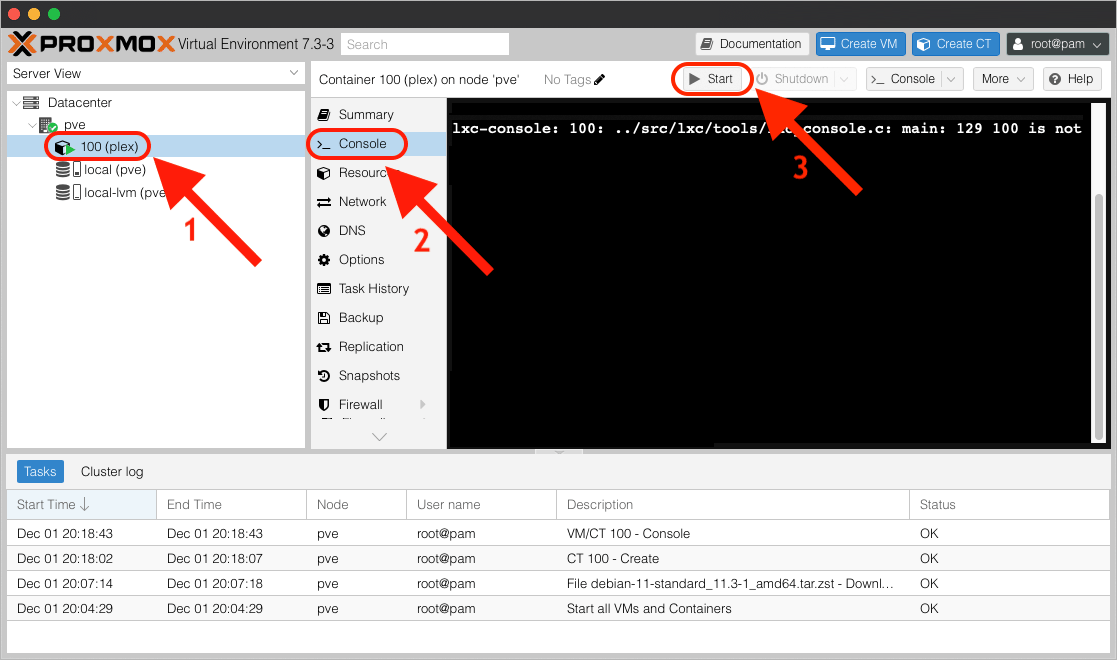
Go back to 100 (plex) [1], Console [2] and Start [3] the container.
Log back in with your credentials.
root
<password>
Installing nfs-common
Once logged in, install the nfs-common package.
apt install nfs-common -y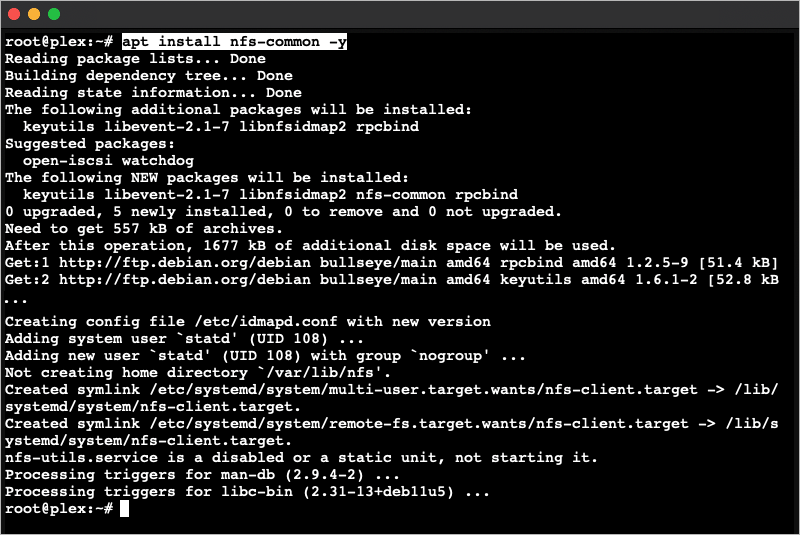
Creating the Mount Directory
Create a directory in which we will mount our NFS share. As we are using Plex, let’s give the directory the appropriate
name;/mnt/plex.
mkdir <directory>
Adding fstab Entries
NFS shares in LXC Containers can be mounted via /etc/fstab, so we will go ahead and edit this file:
nano /etc/fstab
Add the following information by replacing <server_path>, <share> and <directory> with your own network
share settings and then save and close the file.
<server_path>:/<share> /<directory> nfs defaults 0 0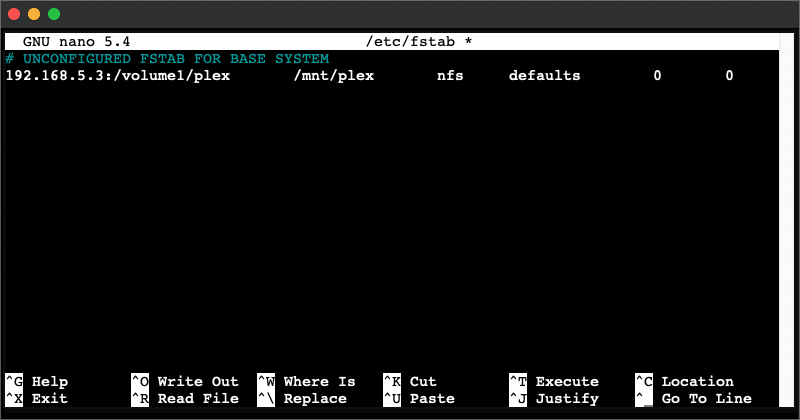
Mounting the Volume
We can now mount the directory in /etc/fstab with the mount -a command.
mount -a
Verify that the files are now seen in the mounted directory.
ls -l <mount-path>
Yep, the files can be seen and the directory will remain mounted even after a reboot.
You can now jump to Completing the Setup or read on for Option 3: Mounting a Directory on the Proxmox host.
Caution: If you are continuing from Option 2: Mounting an NFS Share, please reset the container first and restart the tutorial from the Configuration section. Your mounted directory will otherwise be mapped twice with different protocols!
Option 3: Mounting a Directory on the Proxmox host
The final option that we will discuss is how to mount an LXC container directory directly from within the Proxmox host.
If your LXC Container is still running, please turn it off with the Shutdown button.
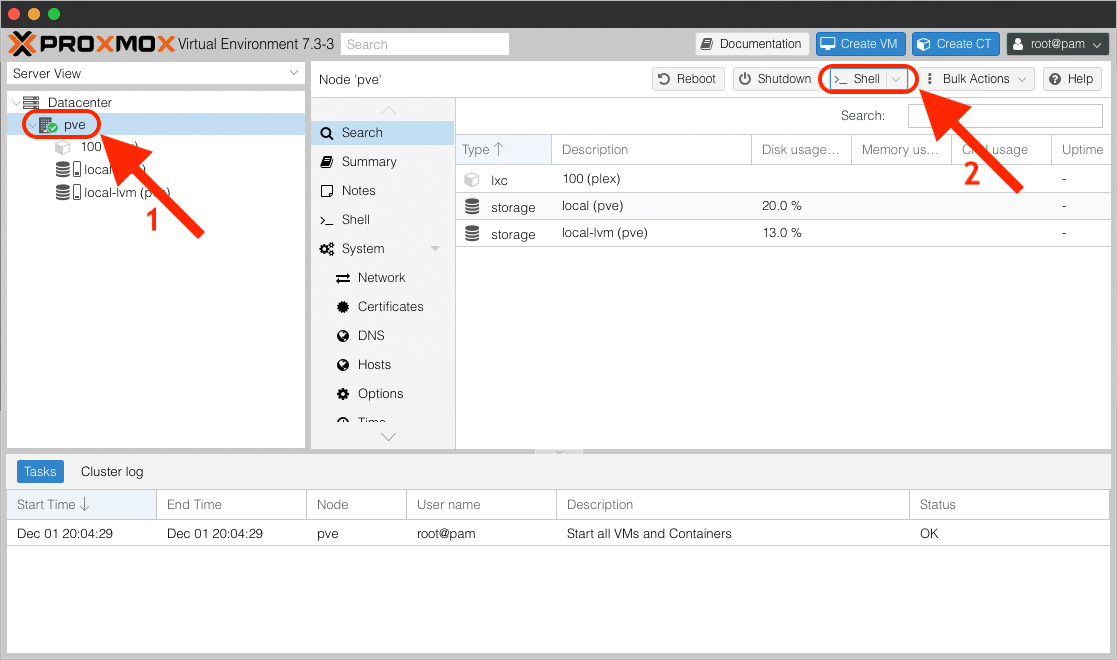
We will now open a terminal directly on the Proxmox host. (Note: not on the container).
Select pve [1] and open up a new Shell [2].
The pct Command
Let’s assume that our media files are stored in the following directory on the Proxmox host, /mnt/plex.
We can now tell Proxmox to mirror this local directory onto the LXC Container with this simple Proxmox Container Toolkit (pct) command:
Replace <id>, <source> and <target> with your own specific parameters.
pct set <id> -mp0 <source>,mp=<target>
Changing File Ownership
If you want the option to be able to delete external files from within Plex Media Server, change the ownership
of the mount directory to plex.
Note: We are currently uncertain whether this is the correct way to change ownership for directories inside LXC Containers. If you aware of a “better” method, please let us know in the comments below and we will update this section. For now, it seems to work for what we are trying to do.
chown -R plex:plex /mnt/plex/
Launching the Container
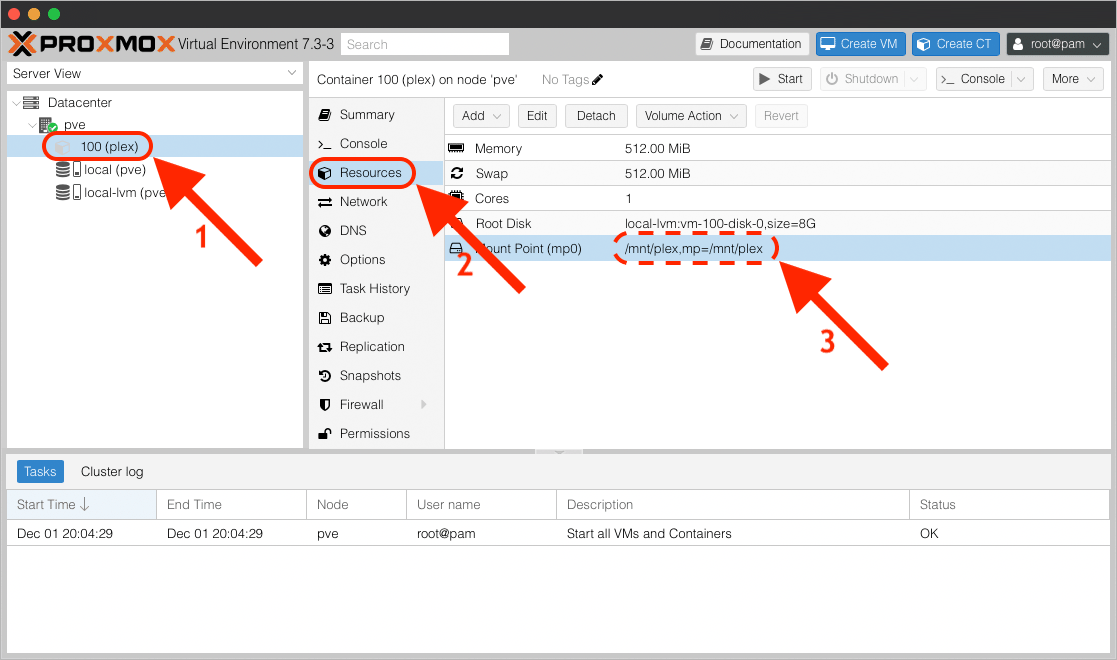
Let’s exit our Proxmox shell and return to the web interface and select 100 (plex) [1], Resources [2]
to verify that the Mount Point (mp0) [3] has been set to /mnt/plex,mp=/mnt/plex.
Good, it is there.
Go back to 100 (plex) [1], Console [2] and Start [3] the container.
Verify that the files are now seen in the mounted directory.
ls -l <mount-path>
Great, the files are there, and we can now continue to Completing the Setup.
Completing the Setup
Select your media folder and press Add.
Once you have finished adding the folders, press Add Library.
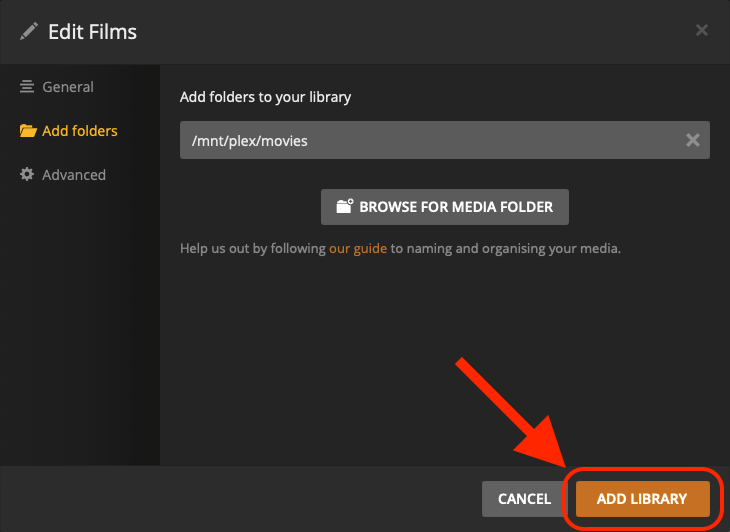
When you are done, press Next.
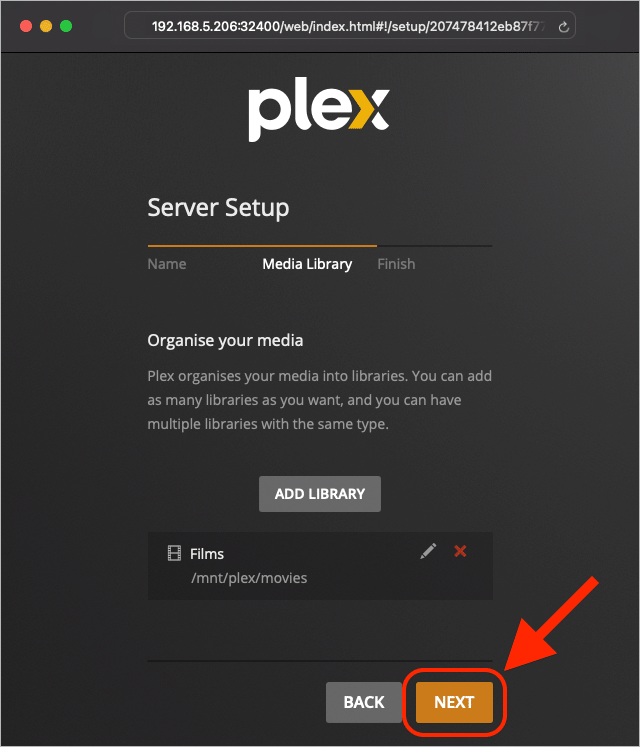
If you need to get some Plex Apps, do that here and then press Done.
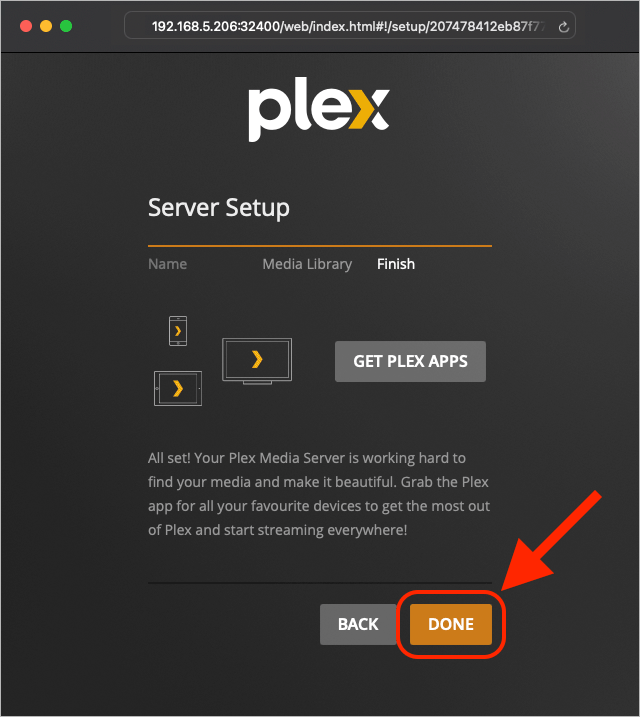
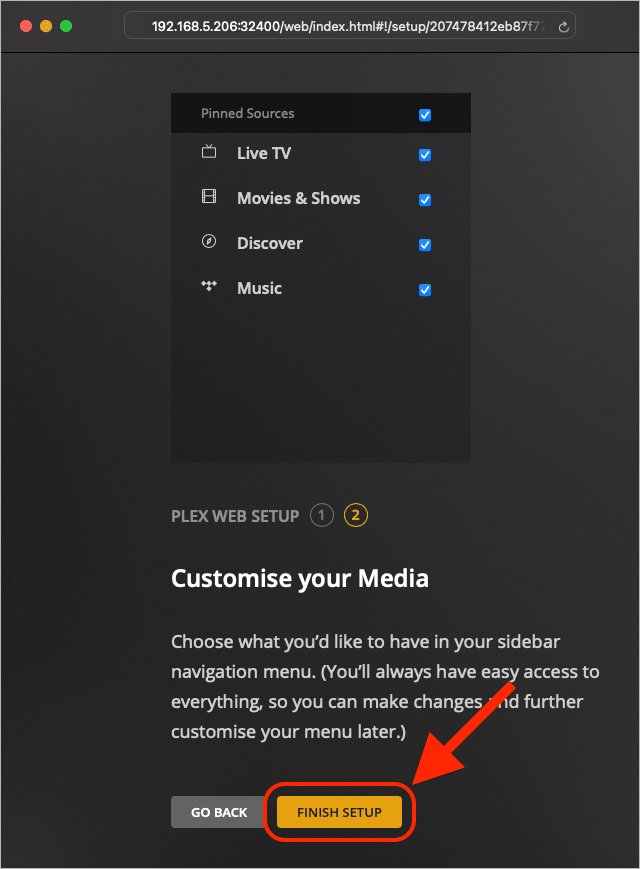
Press Finish Setup.
Congratulations! Plex Media Server is now up and running in the LXC Container, and it has also full access to the files on your network.
Summary
Proxmox containers are a lightweight alternative to fully Virtualized Machines VMs. This guide has shown how Plex Media Server can be installed in a Linux Container (LXC) and how external files can be accessed from within the container.
References
Proxmox
https://www.proxmox.com
Virtualized Machine (VM)
https://en.wikipedia.org/wiki/Virtual_machine)
Plex Media Server
https://www.plex.tv
Linux Container (LXC)
https://pve.proxmox.com/wiki/Linux_Container
Kernel (Operating System)
https://en.wikipedia.org/wiki/Kernel_(operating_system)
Operating System (OS) https://en.wikipedia.org/wiki/Operating_system
Privileged and Unprivileged LXC Containers
https://linuxcontainers.org/lxc/security/
Local Area Network (LAN) https://en.wikipedia.org/wiki/Local_area_network
Proxmox VE 7.3-3
https://www.proxmox.com/en/downloads/item/proxmox-ve-7-3-iso-installer
Debian 11 Bullseye (standard) 11.3-1
http://download.proxmox.com/images/system/
Debian.org
https://www.debian.org
Ubuntu
https://ubuntu.com
How to Set Up Static DHCP So Your Computer’s IP Address Does Not Change
https://www.howtogeek.com/69612/how-to-set-up-static-dhcp-on-your-dd-wrt-router/
Router (Computing) https://en.wikipedia.org/wiki/Router_(computing)
Domain Name System (DNS)
https://en.wikipedia.org/wiki/Domain_Name_System
Advance Package Tool (APT)
https://en.wikipedia.org/wiki/APT_(software)
Curl
https://curl.se
GnuPG
https://gnupg.org
Libusb
https://libusb.info
Network Attached Storage (NAS) https://en.wikipedia.org/wiki/Network-attached_storage
SMB/CIFS
https://en.wikipedia.org/wiki/Server_Message_Block
NFS
https://en.wikipedia.org/wiki/Network_File_System
cifs-utils
https://packages.debian.org/stable/otherosfs/cifs-utils
nano
https://www.nano-editor.org)
systemd
https://en.wikipedia.org/wiki/Systemd
fstab
https://en.wikipedia.org/wiki/Fstab)
Unit Configuration File (.mount)
https://www.freedesktop.org/software/systemd/man/systemd.mount.html
nfs-common
https://packages.debian.org/bullseye/nfs-common
Proxmox Container Toolkit (pct)
https://pve.proxmox.com/pve-docs/chapter-pct.html
See Also
How to click anywhere in a window to move it around on macOS Monterey
How to replace a drive on a Synology NAS with Synology Hybrid RAID (SHR) on DiskStation Manager (DSM) 6.2
How to test the memory and to find the results on a Synology NAS
How to secure IOT devices with VLANs and firewall rules on an Ubiquiti EdgeRouter-X and a MikroTik switch running SwOS Lite
How to turn your Mac into an AirPrint server - for free
How to schedule tasks with crontab on macOS

How to install and configure Syncthing on the Mac

How to restart the Samba (SMB) file sharing service on macOS
How to enable case-sensitive file system support in PyCharm for macOS
How to disable Adobe Creative Cloud during startup on the Mac
comments powered by Disqus
See also
- How to click anywhere in a window to move it around on macOS Monterey
- How to replace a drive on a Synology NAS with Synology Hybrid RAID (SHR) on DiskStation Manager (DSM) 6.2
- How to test the memory and to find the results on a Synology NAS
- How to secure IOT devices with VLANs and firewall rules on an Ubiquiti EdgeRouter-X and a MikroTik switch running SwOS Lite
- How to turn your Mac into an AirPrint server - for free
- How to schedule tasks with crontab on macOS
- How to install and configure Syncthing on the Mac
- How to restart the Samba (SMB) file sharing service on macOS
- How to enable case-sensitive file system support in PyCharm for macOS
- How to disable Adobe Creative Cloud during startup on the Mac