Table of Contents
How to add new PDF compression filters for the Preview tool on Mac
Apart from viewing photos and documents the Preview tool in macOS allows you to also reduce the file size of existing PDF files. Unfortunately the default compression settings are too high which leads to blurry images and text. We will in this guide show how you can customise these settings.
Requirements
- macOS Mojave (or later)
- Preview 10.1 (or later)
Introduction
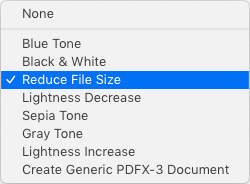
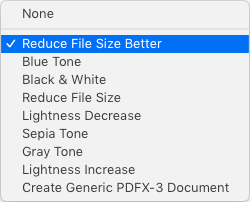
Below is a screen grab of the Quartz Filter option menu that ships with the Preview tool. We will in this example create additional Reduce File Size filters.
There are two ways that we can create these filters:
- Using the Color Sync Utility (the easy way)
- Using the Command Line (the geeky way)
Color Sync Utility (the easy way)
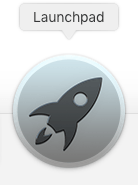
Let us start with the easy way. Press the Launchpad button in the system dock.
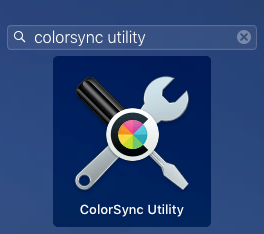
Locate the ColorSync Utility, found in the Other folder or simply start typing “colorsync” in the search field and the app icon will appear automatically.
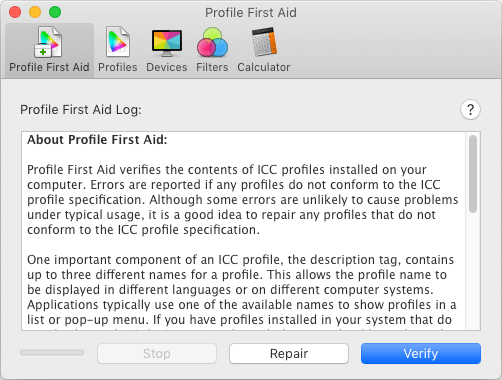
We will be presented with a rather obscure Profile First Aid page in the ColorSync Utility tool. This is not the page that we are interested in.
We will instead press the Filters tab in the top hand menu to bring up a list of available Quartz Filters.
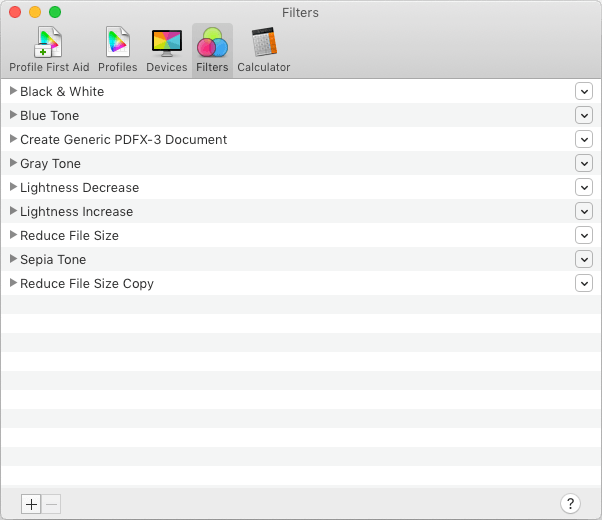
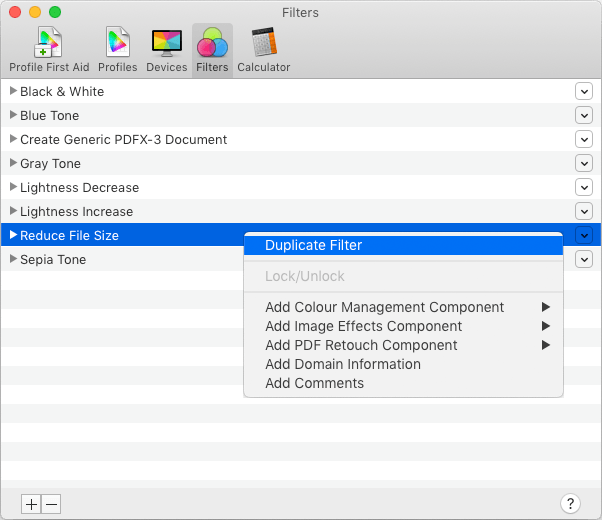
Select the row labelled Reduce File Size and left-click on the small arrow button on the right hand side. This brings up a new sub menu where we will select Duplicate Filter.
We have now made a copy of the filter and can start to modify its settings.
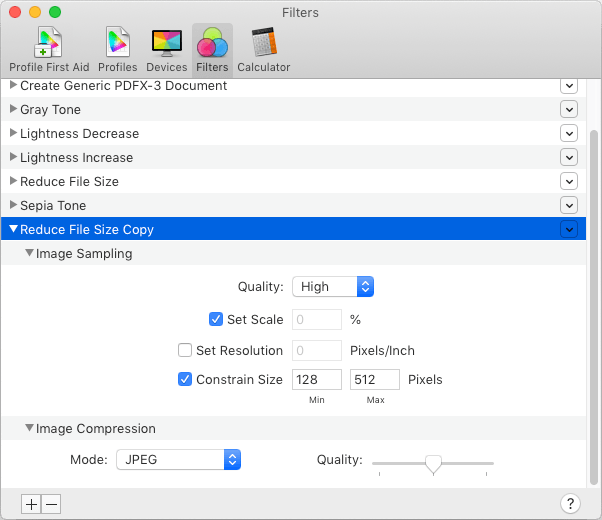
At the time of writing we have not been unable to find a “magic” setting that will work with every single PDF file because the values depend on the type of images used and/or if the document only contains text. But as a start, try to increase the Constrain Size Max field which usually yields a higher quality document at the expense of larger file. Do not forget to rename your new filter by double clicking on its name.
Easy Conclusion
Now when we select File > Export…
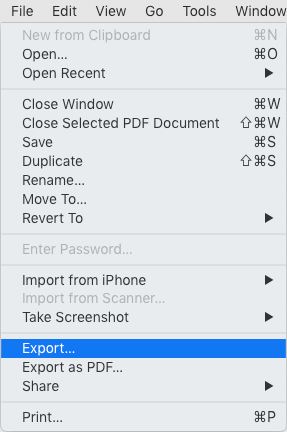
…we will see in the export window, under the Quartz Filter, that our new menu entry has been added.
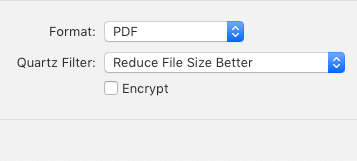
We can now go ahead and export our PDFs with the new Reduce File Size Better filter.
Command Line (the geeky way)
We could stop here, but since this a website for geeks, we will now go under the hood and show what the ColorSync Utility actually does when a new filter is created.
The default Resize File Size filter is located in a less known location:
/System/Library/Filters/Reduce File Size.qfilterWe will make a copy of this file and place it in our local ~/Library/Filters folder. Any settings located here will be appended to the list of existing filters. For the sake of easier file path manipulation we have replaced the blank spaces with underscores in the new file name.
$ cp "/System/Library/Filters/Reduce File Size.qfilter" ~/Library/Filters/Reduce_File_Size_Better.qfilterLet us open this file in our favourite text editor. We will use nano in this guide:
$ nano ~/Library/Filters/Reduce_File_Size_Better.qfilter<?xml version="1.0" encoding="UTF-8"?>
<!DOCTYPE plist PUBLIC "-//Apple Computer//DTD PLIST 1.0//EN" "http://www.apple.com/DTDs/PropertyList-1.0.dtd">
<plist version="1.0">
<dict>
<key>Domains</key>
<dict>
<key>Applications</key>
<true/>
<key>Printing</key>
<true/>
</dict>
<key>FilterData</key>
<dict>
<key>ColorSettings</key>
<dict>
<key>DocumentColorSettings</key>
<dict>
<key>CustomLHSCorrection</key>
<array>
<integer>8</integer>
<integer>8</integer>
<integer>8</integer>
</array>
</dict>
<key>ImageSettings</key>
<dict>
<key>Compression Quality</key>
<real>0.0</real>
<key>ImageCompression</key>
<string>ImageJPEGCompress</string>
<key>ImageScaleSettings</key>
<dict>
<key>ImageScaleFactor</key>
<real>0.5</real>
<key>ImageScaleInterpolate</key>
<true/>
<key>ImageSizeMax</key>
<integer>512</integer>
<key>ImageSizeMin</key>
<integer>128</integer>
</dict>
</dict>
</dict>
</dict>
<key>FilterType</key>
<integer>1</integer>
<key>Name</key>
<string>Reduce File Size</string>
</dict>
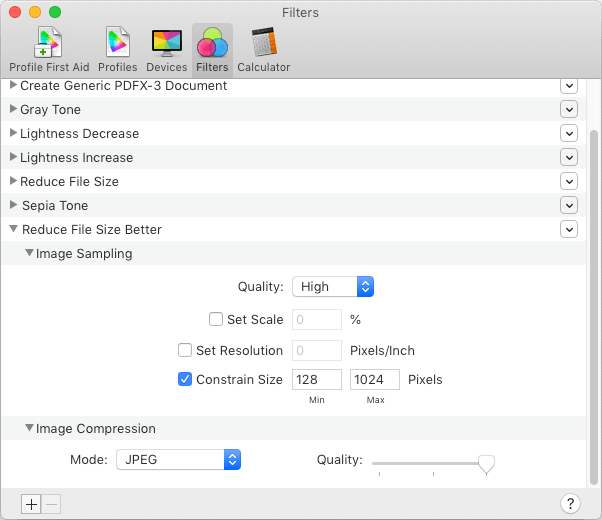
</plist>As we have already previously mentioned, exact filter settings depend on many factors such as the type of images used and/or if the document only contains text. We will therefore only modify the ImageSizeMax field for now as it is guaranteed to always increase image quality (and size). Let us double this value to 1024.
<key>ImageSizeMax</key>
<integer>1024</integer>
We will also change the name of this filter. The name is what will be seen in the Quartz Filter menu.
<key>Name</key>
<string>Reduce File Size Better</string>
Go ahead and save the file and launch Preview. Then select File > Export… from the top menu bar to see our new filter.
Geeky Conclusion
We have shown two different ways to create new file reduction filters for the Preview app on macOS. Whether you prefer the easy way or the geeky way, both options are equally valid.
See Also

How to create PDFs with the Preview tool on Mac

How to install Homebrew for Mac

How to find out which shell I am running?

How to sync files with lftp

How to mirror drives with rsync
How to install a Samsung ML-191x 252x Series printer with AirPrint support on a Raspberry Pi

Querying the Illuminates by Default attribute in Maya
Remove nodes from a set in Maya
comments powered by Disqus
See also
- How to create PDFs with the Preview tool on Mac
- How to install Homebrew for Mac
- How to find out which shell I am running?
- How to sync files with lftp
- How to mirror drives with rsync
- How to install a Samsung ML-191x 252x Series printer with AirPrint support on a Raspberry Pi
- Querying the Illuminates by Default attribute in Maya
- Remove nodes from a set in Maya