Table of Contents
How to mount an SMB network share on macOS Ventura without the Finder window popping up
The built-in Login Items function on macOS can be used to automatically mount SMB network shares. However, when doing so an unwanted Finder window pops up. We introduce here a simple, yet effective, AppleScript that prevents this from happening.
Requirements
- Tested on macOS Ventura 13.6
- A running SMB Server (i.e. Synology, QNAP, TrueNAS, Unraid)
- Password(s) stored in the keychain
Storing SMB Password(s) in the Keychain
This script relies on the keychain to store your SMB server’s login credentials. Before going any further we will try to make a manual connection to ensure that our password(s) can be saved and retrieved later.
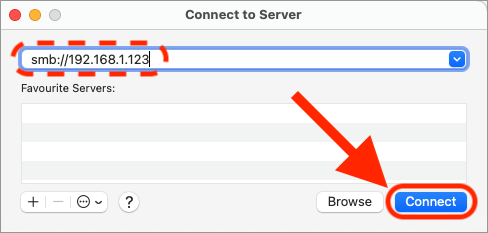
From the Finder, press Command (⌘) + K to open the Connect to Server window.
Type in your server’s IP or DNS address. We are in this example using the made-up address smb://192.168.1.123.
Press Connect.
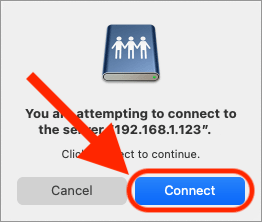
Confirm that you wish to proceed by pressing Connect again.
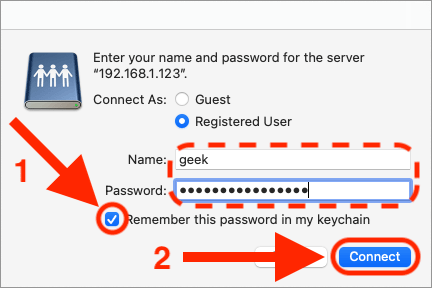
Enter your user Name and Password.
Make sure that Remember this password in my keychain [1] has been checked.
💡This step is very important!
Press Connect [2].
Select your network shares and press OK.
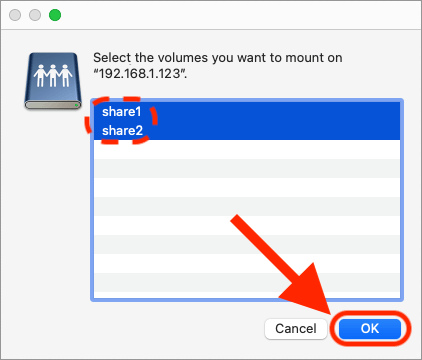
The shared volumes should now appear on the Desktop.
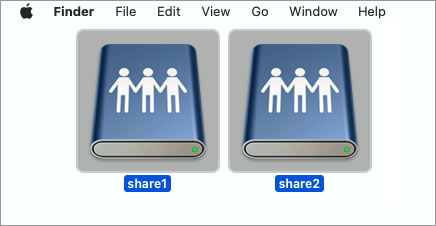
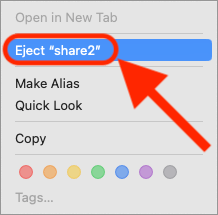
Right Click on the network share(s) and press Eject because we don’t need them yet.
We have successfully saved the password(s) of the network shares in the keychain and can now start the tutorial.
Showing All Filename Extensions (Optional)
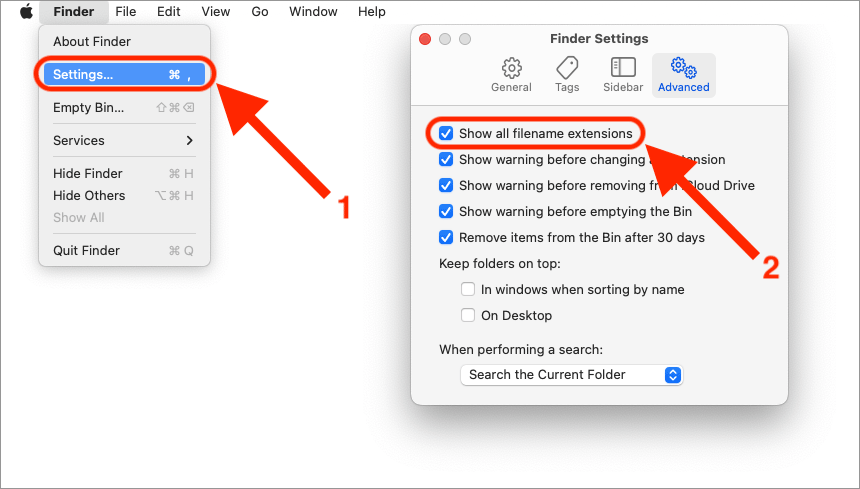
This step is optional, but it is highly recommended to adjust your Finder window Settings [1] and enable Show all filename extensions [2] under the Advanced tab.
Setting up the Script
Open the Script Editor from under /Applications/Utilities.

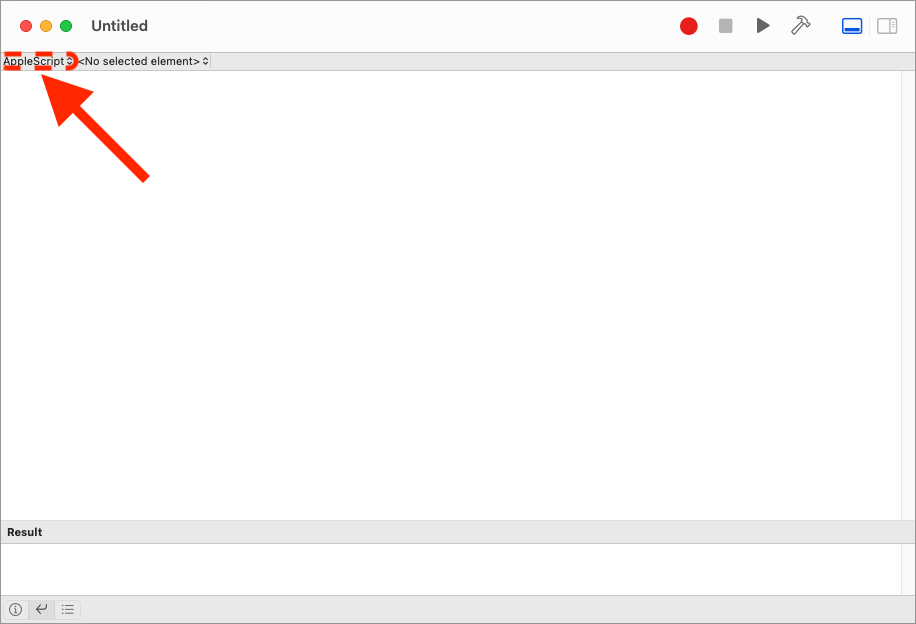
An empty Script Editor window will appear.
💡Take note of the Default Script Language which should be set to AppleScript (not JavaScript).
Before we dive in, let’s Save our empty script so that we can later make quick saves whilst working.
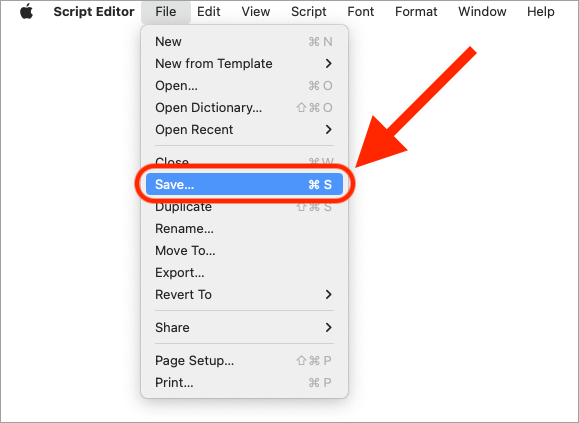
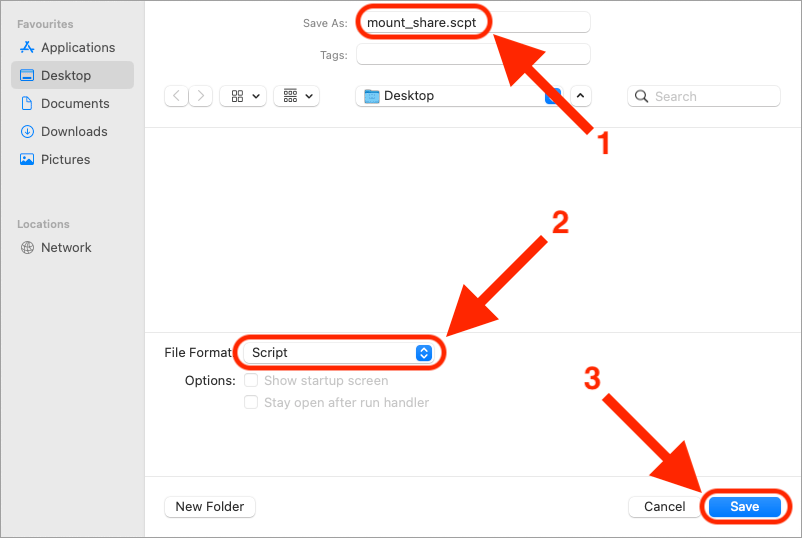
We are in this example naming the file mount_share.scpt [1] and are saving it on the Desktop, but feel free to call it
whatever you like.
Make sure File Format is set to Script [2].
Press Save [3] to close the window.
Defining the Keychain
With the file saved, let’s type the first line.
set keychainName to "/Users/" & (do shell script "whoami") & "/Library/keychains/login.keychain-db"This command retrieves the path to the user’s keychain by combining the user’s home directory with the standard keychain
location and stores the result in the keychainName variable.
💡Any line starting two hyphens (- -) is a comment and is ignored when the script is executed.
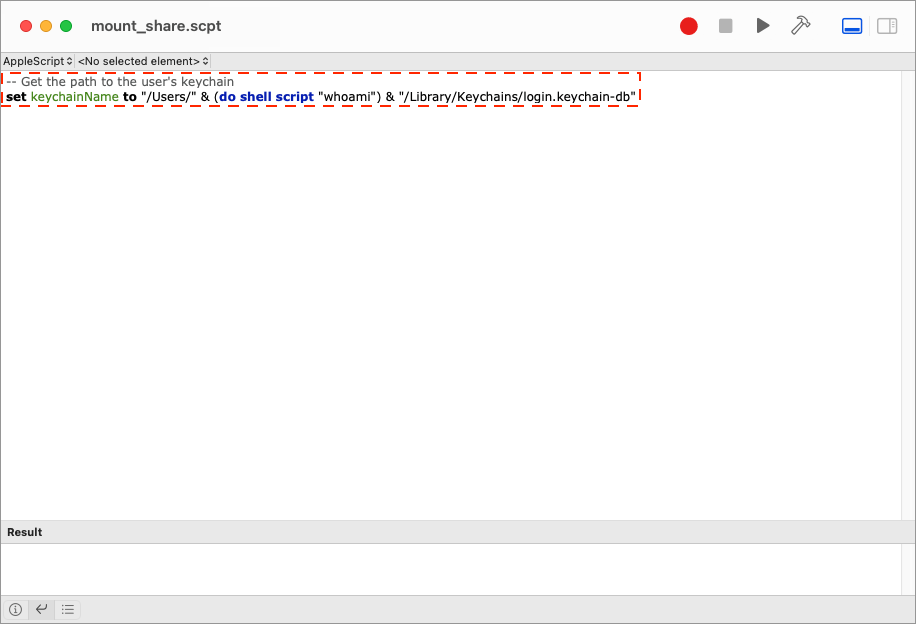
💡You will have to save the script by pressing Command (⌘) + S in order for the syntax highlighting to work. Yes, we know it’s annoying!
On the next line, define an empty list called shareConfigurations to hold the configurations for each network share.
set shareConfigurations to {}We will then append share configurations to the shareConfigurations list using the set end of command.
Each configuration consists of three variables; username, server address and share name, which is where you typically
add information about your specific network share.
set end of shareConfigurations to {username:"<your_user_name>", server:"<your_server_name>", share:"<your_network_share>"}💡You will need to replace the contents between the brackets "< >" with your own server’s SMB details.
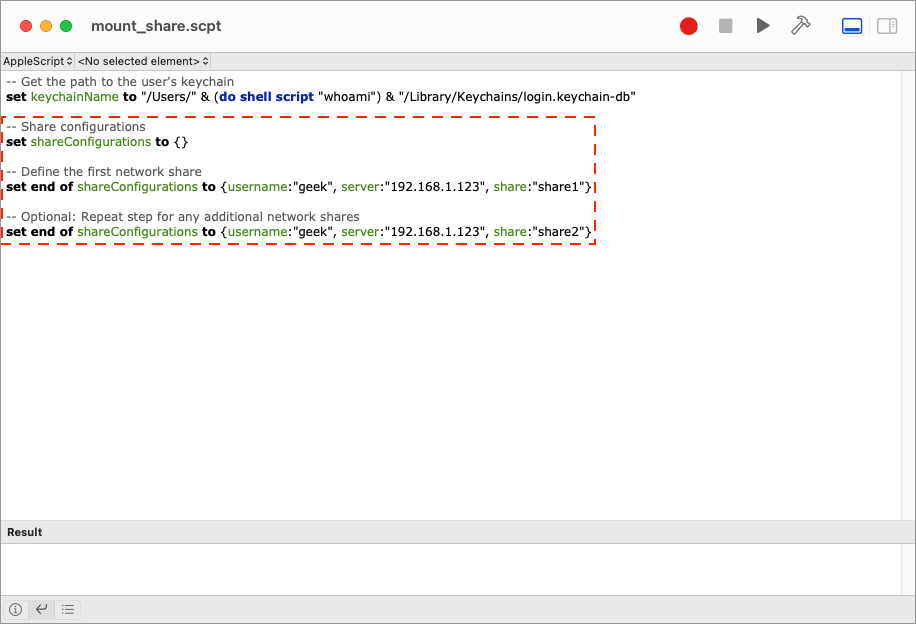
💡The line starting with “set end of” can be repeated for each new network share.
With the configuration defined we can now iterate through each share configuration in the shareConfigurations list.
repeat with shareConfig in shareConfigurationsAdd a few blank lines to close the loop block with the end repeat command.
end repeat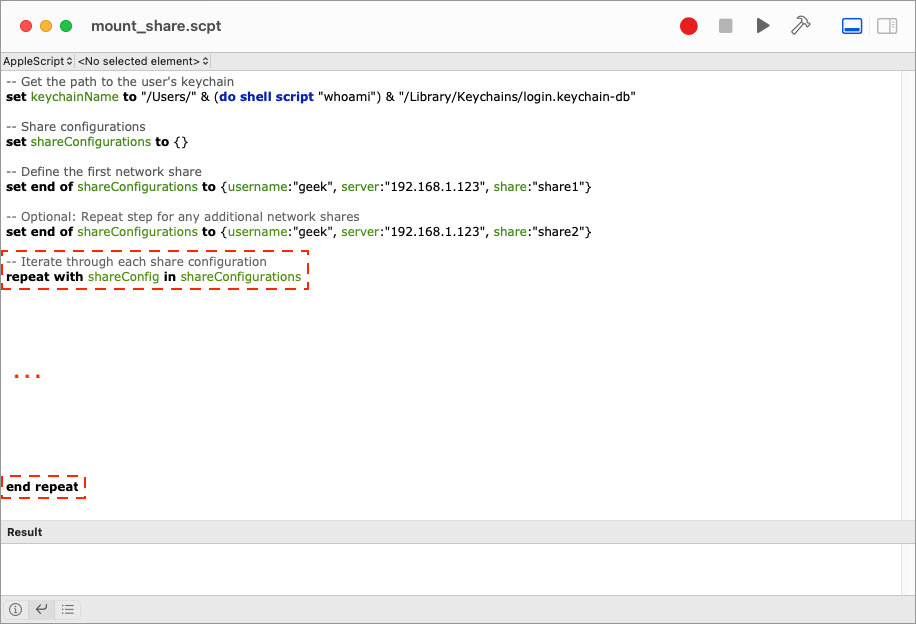
Going back to the start of the loop, we will now extract the username, server, and share variables from the current
shareConfig variable.
	set username to username of shareConfig
	set server to server of shareConfig
	set share to share of shareConfig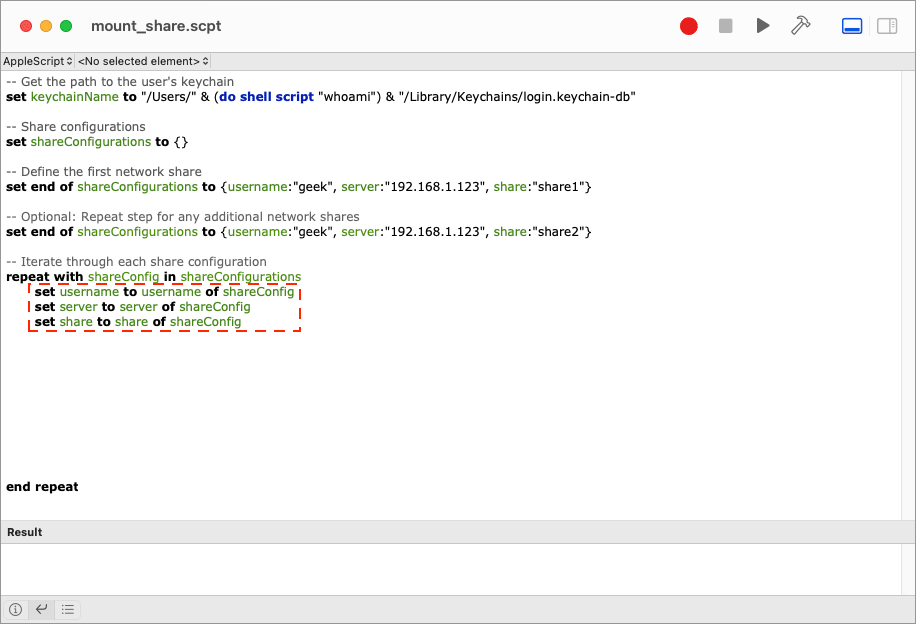
💡The Script Editor automatically indents lines when inside a loop.
Retrieving Password(s) from the Keychain
We will then use the security command-line utility to retrieve the password from the keychainName for the specified username
and server.
set passwordResult to (do shell script "security find-internet-password -a \"" & username & "\" -s \"" & server & "\" -w " & keychainName)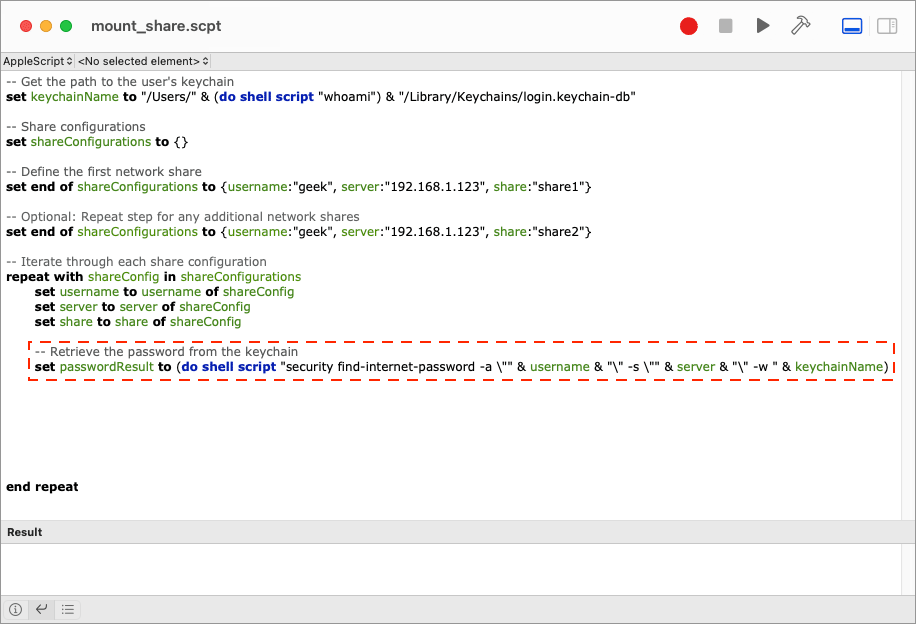
Mounting the Volume
We are now ready to mount the network share(s). Let’s start by wrapping the Finder application in a
try
block to handle any errors that may occur during the mount operation. We can then mount the network share with the obtained
username, password, server, and share values using the mount volume command.
	tell application "Finder"
		try
			mount volume "smb://" & username & ":" & passwordResult & "@" & server & "/" & share
		end try
	end tell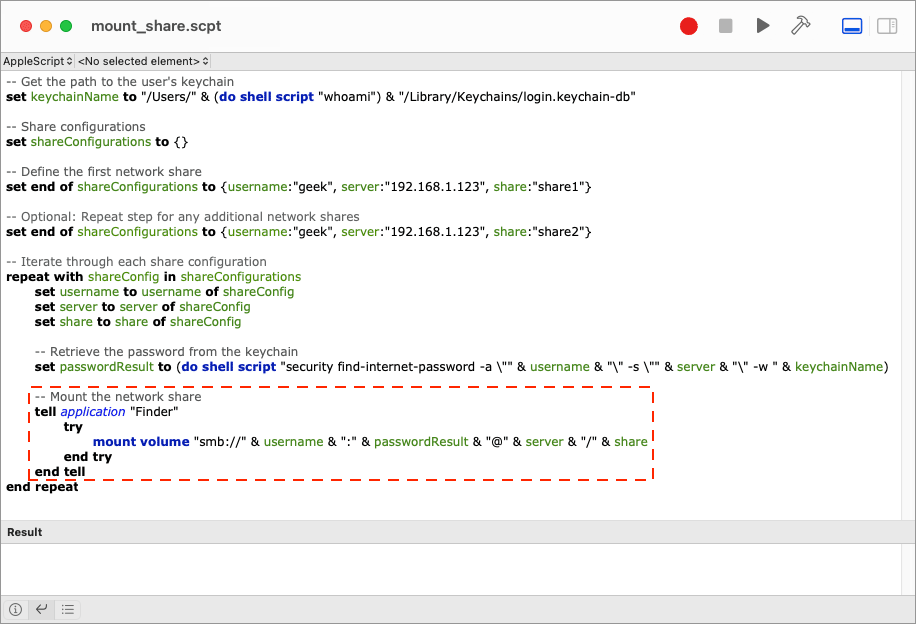
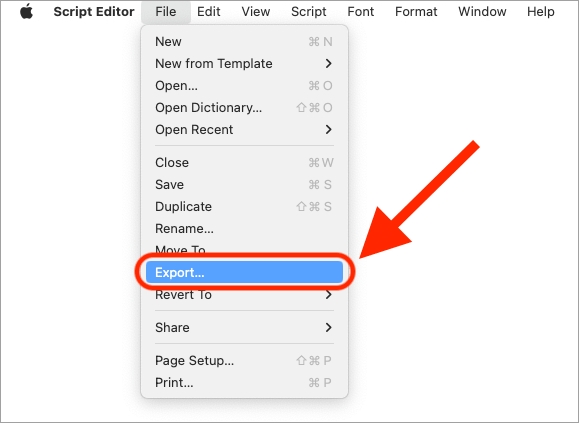
Exporting the Application
Before we can test the script we need to Export it as an app.
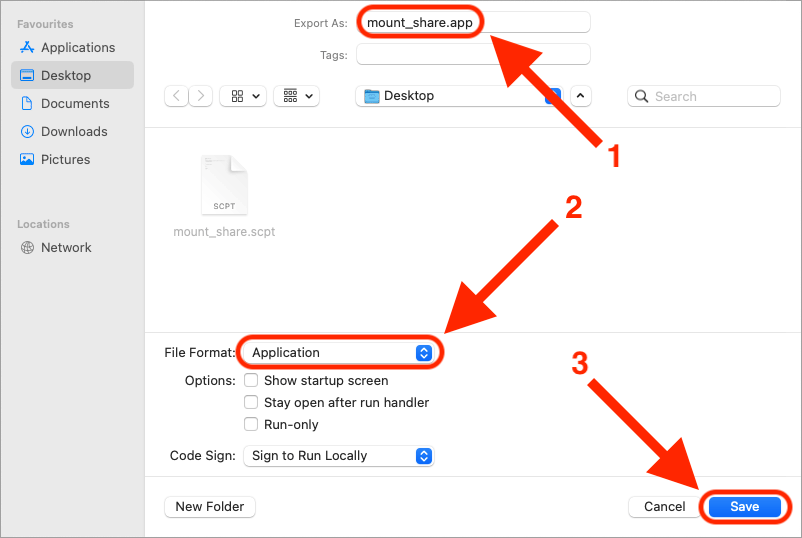
Let’s save the app as, mount_share.app [1], and change the File Format to Application [2].
Press Save [3] to export it.
Testing the Application
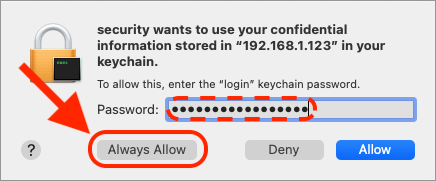
We are now ready to test the application. Simply Double-Click on the mount_share.app icon to launch it.

Enter your macOS’s login Password and press Always Allow.
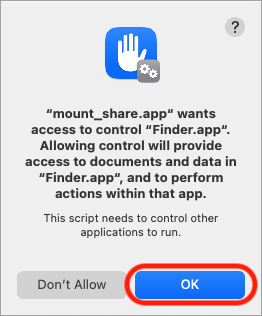
A pop-up window similar to the one below will appear.
Press OK to give your application access to the system.
If everything has been configured correctly, your network shares should appear on the Desktop.
Persistence Between Reboots
We could finish our article here but there is one piece of the puzzle still missing, and that is how to make our network shares persist between reboots.
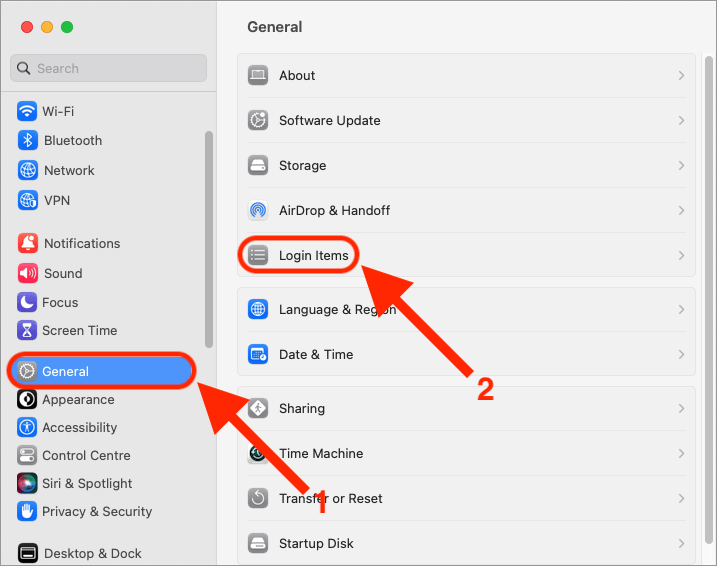
Open System Settings.
Goto General [1] and Login Items [2].
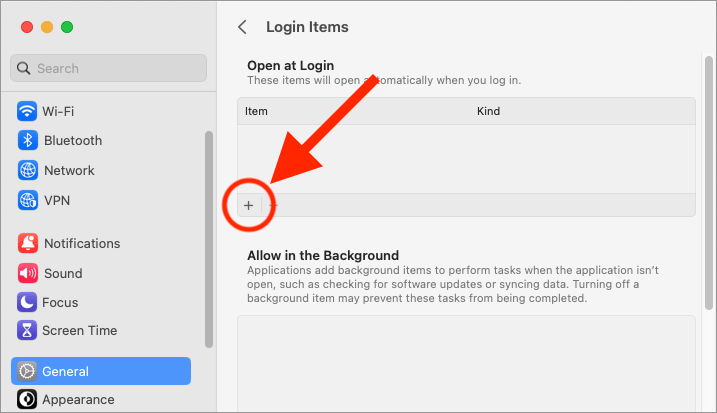
Press the + symbol to add a new Login Item.
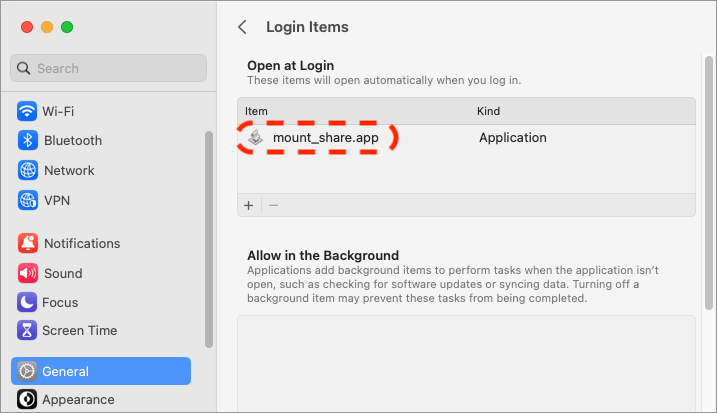
Browse to the Desktop and select the mount_share.app [1].
Press Open [2].

Confirm that mount_share.app has appeared in the list.
The next time you reboot the machine your networks shares should automatically be mounted.
Uninstalling the Application
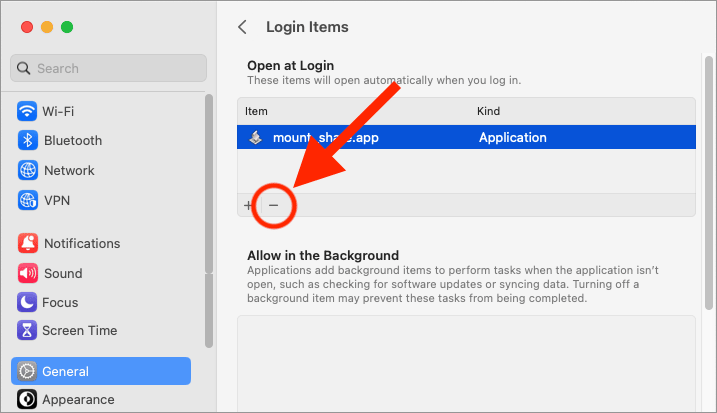
If you no longer wish to use the application, return to System Settings and select General [1] and Login Items [2].
Select mount_share.app from the list and press the – symbol to remove it.
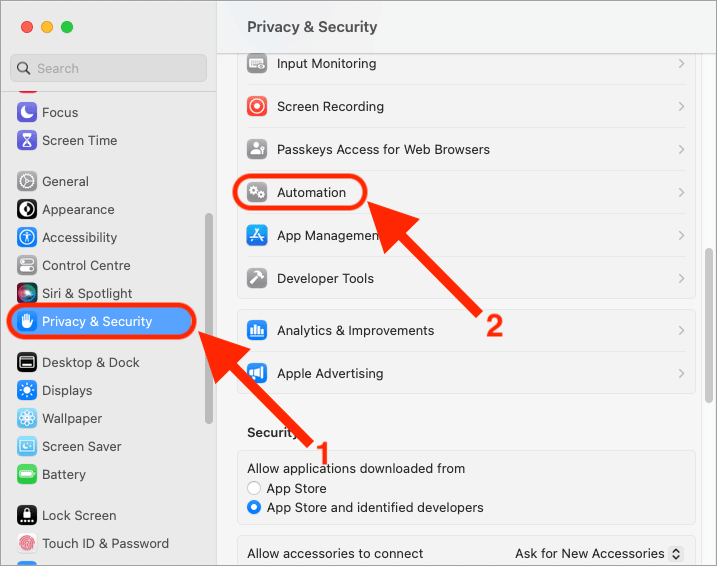
If you want to remove every trace of the application, one more step is required.
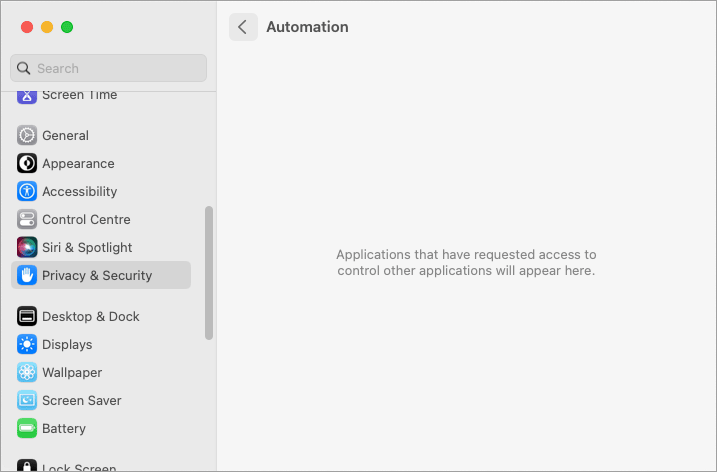
Go back into System Settings, select Privacy & Security [1] and Automation [2].
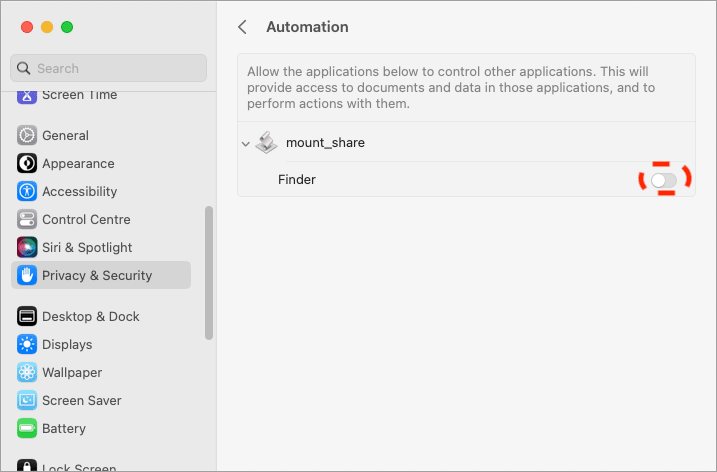
You will see the mount_share application listed and can either temporarily disable it by turning off the Finder
option or you can permanently remove it with help of a Terminal
command.
Introducing the tccutil Command
The tccutil command manages the privacy database, which stores decisions the user has made about whether apps may access personal data.
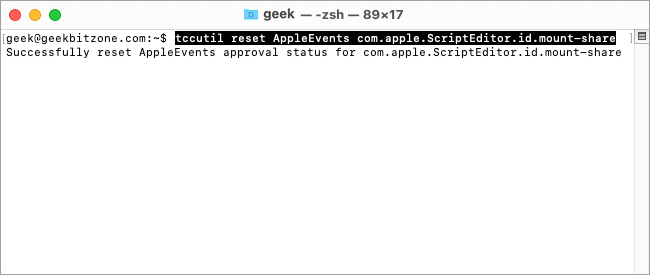
Open a new Terminal.

Type the following command:
tccutil reset AppleEvents com.apple.ScriptEditor.id.mount-share💡Replace “mount-share” with the name of your given application.
When you see the message “Successfully reset AppleEvents approval status for com.apple.ScriptEditor.id.mount-share”, the command executed correctly.
On the Automation page you should no longer see the application listed.
The Complete Script
Here is the complete script which can be modified to suit your own requirements.
-- Get the path to the user's keychain
set keychainName to "/Users/" & (do shell script "whoami") & "/Library/keychains/login.keychain-db"

-- Share configurations
set shareConfigurations to {}

-- Define the first network share
set end of shareConfigurations to {username:"<your_user_name>", server:"<your_server_name>", share:"<your_network_share>"}

-- Optional: Repeat previous step for any additional network shares

-- Iterate through each share configuration
repeat with shareConfig in shareConfigurations
	set username to username of shareConfig
	set server to server of shareConfig
	set share to share of shareConfig

	-- Retrieve the password from the keychain
	set passwordResult to (do shell script "security find-internet-password -a \"" & username & "\" -s \"" & server & "\" -w " & keychainName)

	-- Mount the network share
	tell application "Finder"
		try
			mount volume "smb://" & username & ":" & passwordResult & "@" & server & "/" & share
		end try
	end tell
end repeat
Summary
This script allows you to define multiple network share configurations and automatically mount them during execution. It retrieves the password securely from the keychain, ensuring that you don’t need to enter the password manually each time. The script utilizes the Finder application to perform the network share mounting.
References
Login Items
https://support.apple.com/en-gb/guide/mac-help/mh15189/mac
SMB
https://en.wikipedia.org/wiki/Server_Message_Block
Finder
https://en.wikipedia.org/wiki/Finder_(software))
macOS Ventura
https://en.wikipedia.org/wiki/MacOS_Ventura
keychain
https://support.apple.com/en-gb/guide/mac-help/mchlf375f392/mac)
Script Editor
https://support.apple.com/en-gb/guide/script-editor/welcome/mac
App
https://support.apple.com/en-gb/guide/script-editor/scpedt1072/2.11/mac/13.0
Terminal
https://support.apple.com/en-gb/guide/terminal/welcome/mac)
See Also

How to install Plex Media Server in a Proxmox Linux Container (LXC)

How to click anywhere in a window to move it around on macOS Monterey

How to replace a drive on a Synology NAS with Synology Hybrid RAID (SHR) on DiskStation Manager (DSM) 6.2

How to test the memory and to find the results on a Synology NAS
How to secure IOT devices with VLANs and firewall rules on an Ubiquiti EdgeRouter-X and a MikroTik switch running SwOS Lite
How to turn your Mac into an AirPrint server - for free

How to schedule tasks with crontab on macOS

How to install and configure Syncthing on the Mac

How to restart the Samba (SMB) file sharing service on macOS

How to enable case-sensitive file system support in PyCharm for macOS
comments powered by Disqus
See also
- How to install Plex Media Server in a Proxmox Linux Container (LXC)
- How to click anywhere in a window to move it around on macOS Monterey
- How to replace a drive on a Synology NAS with Synology Hybrid RAID (SHR) on DiskStation Manager (DSM) 6.2
- How to test the memory and to find the results on a Synology NAS
- How to secure IOT devices with VLANs and firewall rules on an Ubiquiti EdgeRouter-X and a MikroTik switch running SwOS Lite
- How to turn your Mac into an AirPrint server - for free
- How to schedule tasks with crontab on macOS
- How to install and configure Syncthing on the Mac
- How to restart the Samba (SMB) file sharing service on macOS
- How to enable case-sensitive file system support in PyCharm for macOS