Table of Contents
How to measure the network speed between two computers with iPerf
The network speed between two computers is affected by several factors such as type of network cable used, network interface card, router, switch, hard drive and so forth. It is therefore not always obvious to understand where the bottleneck lies when the connection seems slower than advertised. We will in this guide explain how to measure network speeds with the command line tool iPerf.
Note: Measuring the network speed is not the same as benchmarking your internet connection, which in most cases is likely to be much slower than your local area network.
Requirements
- Two computers (running macOS/Linux or Windows) that are able to “see” each other on the same network, i.e. they should be able to respond to each other’s ping requests.
Downloading iPerf
iPerf is free and available for download from the following address:
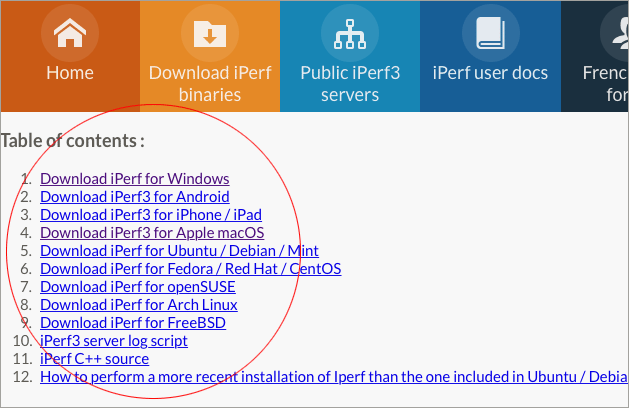
Navigate to the Download iPerf binaries page.
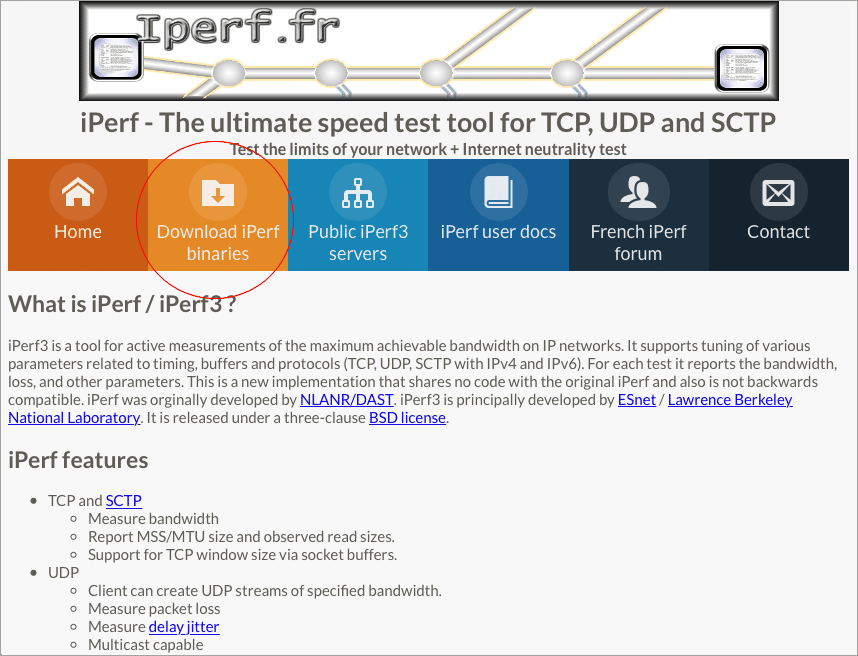
Select your operating system and download the file which comes in the form a zip archive. Unless told otherwise it is recommended to always download the latest version of iPerf.
https://iperf.fr/iperf-download.php
Depending on your operating system, the extracted zip file usually only contains a single file called iperf3
(or iperf3.exe if you are running Windows). The number in the end indicates that the software is on its third major release cycle.
Configuring iPerf
iPerf can be run from any location, but it is recommended to move the file into a directory where your other executables
are stored, such as /usr/local/bin on the Mac or C:\Program Files on Windows. If you want to save the file somewhere
completely different, but want to avoid the hassle of specifying the exact path to iperf3, its directory will have to be added to your search path.
Linux Installation Path
For Linux Bash shell users, the following line will need to be added to the appropriate file that is read when your shell launches.
export PATH=$PATH:/your/custom/path There are a few different places where you could conceivably set the variable name: ~/.bash_profile, ~/.bashrc, or ~/.profile.
The difference between these files is (primarily) when they get read by the shell. If you are not sure where to add the path,
~/.bashrc is a good start. Different locations may exist in other Linux distributions, but that is beyond the scope of this article.
Windows Installation Path
On Windows you can set the custom path from within the Control Panel > System Properties > Environment Variables window.

Mac Installation Path
On the Mac you can append your custom path to the end of the file in /etc/paths.
$ sudo nano /etc/paths

/usr/local/bin
/usr/bin
/bin
/usr/sbin
/sbin
/your/custom/path
To verify that your new path has been set, type the following in a Terminal.
$ echo $PATH

/usr/local/bin:/usr/bin:/bin:/usr/sbin:/sbin:/your/custom/path
Finding our IP Addresses
Before we begin to test iPerf we need to take a note of our local machine’s IP addresses for the purpose of the next step.
Linux IP Address
On some Linux distributions, such as Ubuntu, you can find your machine’s IP address simply by typing hostname -I in a shell.
$ hostname -I

192.168.1.101
Mac IP Address
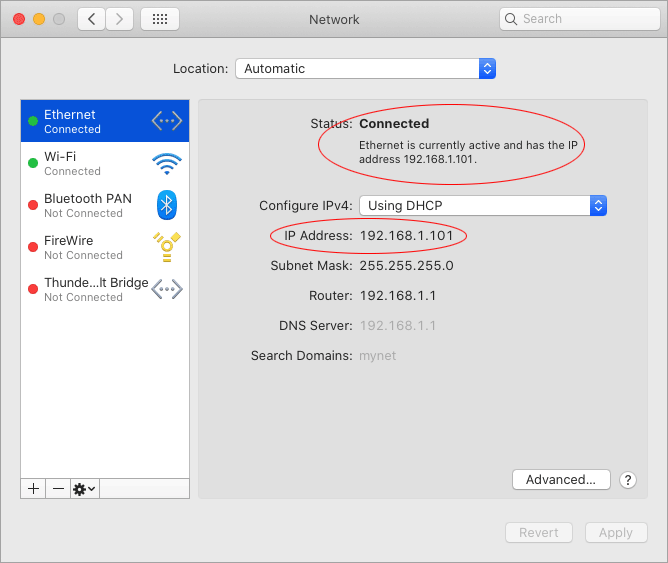
On the Mac your easiest bet is to go into System Preferences > Network to view your IP address. Just make sure you have selected the correct service (Ethernet, Wi-Fi, etc) first from the left-hand column.
Windows IP Address
Finally, on Windows you can query your local IP address by typing ipconfig in a Command Prompt.
C:\> ipconfig

Windows IP Configuration

Ethernet adapter Local Area Connection

Connection-specific DNS Suffix. . :
Link-local IPv6 Address . . . . . : fe80:8524:7a12:c4543:214d
IPv4 Address. . . . . . . . . . . : 192.168.1.101
Subnet Mask . . . . . . . . . . . : 255.255.255.0
Default Gateway . . . . . . . . . : 192.168.1.1

...
We are on this occasion looking for the IPv4 Address, which is 192.168.1.101.
How to use iPerf
iPerf operates in two modes; server and client mode. A server, in the context of iPerf, is the machine that receives packets (of data) and client is the machine that sends the packets.
Server Mode
To start a server, open a terminal on your first computer and type iperf3 -s.
$ iperf3 -s

-----------------------------------------------------------
Server listening on 5201
-----------------------------------------------------------
We can see that the server is now listening for packets on port 5201.
Client Mode
Now, go to your second computer and type, iperf3 -c 192.168.1.101, to start the client.
(You should replace the fictional IP number with your own server IP address).
$ iperf3 -c 192.168.1.101

Connecting to host 192.168.1.101, port 5201
[  4] local 192.168.1.102 port 12345 connected to 192.168.1.101 port 5201
[ ID] Interval           Transfer     Bandwidth
[  4]   0.00-1.00   sec   113 MBytes   952 Mbits/sec
[  4]   1.00-2.00   sec   112 MBytes   942 Mbits/sec
[  4]   2.00-3.00   sec   111 MBytes   931 Mbits/sec
[  4]   3.00-4.00   sec   112 MBytes   941 Mbits/sec
[  4]   4.00-5.00   sec   112 MBytes   940 Mbits/sec
[  4]   5.00-6.00   sec   110 MBytes   923 Mbits/sec
[  4]   6.00-7.00   sec   112 MBytes   940 Mbits/sec
[  4]   7.00-8.00   sec   112 MBytes   940 Mbits/sec
[  4]   8.00-9.00   sec   112 MBytes   940 Mbits/sec
[  4]   9.00-10.00  sec   112 MBytes   940 Mbits/sec
- - - - - - - - - - - - - - - - - - - - - - - - -
[ ID] Interval           Transfer     Bandwidth
[  4]   0.00-10.00  sec  1.09 GBytes   939 Mbits/sec                  sender
[  4]   0.00-10.00  sec  1.09 GBytes   938 Mbits/sec                  receiver
The client will immediately start to send data to the server as fast as the hardware possibly allows. In our example the maximum throughput appears to be around 940 Mbits/second, which is what you can roughly expect from a 1 Gbps network.
Additional Options
iPerf comes with a myriad of other options which can be passed as additional command line arguments.
For a full list of available commands, type iperf3 --help.
$ iperf3 --help

Usage: iperf [-s|-c host] [options]
       iperf [-h|--help] [-v|--version]

Server or Client:
  -p, --port      #         server port to listen on/connect to
  -f, --format    [kmgKMG]  format to report: Kbits, Mbits, KBytes, MBytes
  -i, --interval  #         seconds between periodic bandwidth reports
  -F, --file name           xmit/recv the specified file
  -B, --bind      <host>    bind to a specific interface
  -V, --verbose             more detailed output
  -J, --json                output in JSON format
  --logfile f               send output to a log file
  -d, --debug               emit debugging output
  -v, --version             show version information and quit
  -h, --help                show this message and quit
Server specific:
  -s, --server              run in server mode
  -D, --daemon              run the server as a daemon
  -I, --pidfile file        write PID file
  -1, --one-off             handle one client connection then exit
Client specific:
  -c, --client    <host>    run in client mode, connecting to <host>
  -u, --udp                 use UDP rather than TCP
  -b, --bandwidth #[KMG][/#] target bandwidth in bits/sec (0 for unlimited)
                            (default 1 Mbit/sec for UDP, unlimited for TCP)
                            (optional slash and packet count for burst mode)
  -t, --time      #         time in seconds to transmit for (default 10 secs)
  -n, --bytes     #[KMG]    number of bytes to transmit (instead of -t)
  -k, --blockcount #[KMG]   number of blocks (packets) to transmit (instead of -t or -n)
  -l, --len       #[KMG]    length of buffer to read or write
                            (default 128 KB for TCP, 8 KB for UDP)
  --cport         <port>    bind to a specific client port (TCP and UDP, default: ephemeral port)
  -P, --parallel  #         number of parallel client streams to run
  -R, --reverse             run in reverse mode (server sends, client receives)
  -w, --window    #[KMG]    set window size / socket buffer size
  -M, --set-mss   #         set TCP/SCTP maximum segment size (MTU - 40 bytes)
  -N, --no-delay            set TCP/SCTP no delay, disabling Nagle's Algorithm
  -4, --version4            only use IPv4
  -6, --version6            only use IPv6
  -S, --tos N               set the IP 'type of service'
  -Z, --zerocopy            use a 'zero copy' method of sending data
  -O, --omit N              omit the first n seconds
  -T, --title str           prefix every output line with this string
  --get-server-output       get results from server
  --udp-counters-64bit      use 64-bit counters in UDP test packets

[KMG] indicates options that support a K/M/G suffix for kilo-, mega-, or giga-

iperf3 homepage at: http://software.es.net/iperf/
Report bugs to:     https://github.com/esnet/iperf
Compiling from Source
It is also possible to download the latest source code for iPerf from GitHub.com. This can be useful if you want early access to features that have not yet made it into the official release.
https://github.com/esnet/iperf
Summary
This guide has shown how network speeds can be measured with iPerf, a TCP, UDP, and SCTP network bandwidth measurement tool, which can prove useful when you need to identify bottlenecks in your network.
Happy Benchmarking!
See Also

How to turn your Raspberry Pi into a Jukebox
How to connect to GitHub with SSH

How to compile OpenEmu for macOS
How to install Gitk for macOS
10 Useful Git Commands

How to access a Plex Server behind CGNAT with ngrok

10 Influential Pixel Artists

How to Customise the Linux Bash Prompt
How to Merge and Rebase in Git

How to add new PDF compression filters for the Preview tool on Mac
comments powered by Disqus
See also
- How to turn your Raspberry Pi into a Jukebox
- How to connect to GitHub with SSH
- How to compile OpenEmu for macOS
- How to install Gitk for macOS
- 10 Useful Git Commands
- How to access a Plex Server behind CGNAT with ngrok
- 10 Influential Pixel Artists
- How to Customise the Linux Bash Prompt
- How to Merge and Rebase in Git
- How to add new PDF compression filters for the Preview tool on Mac